HAPPY VEG
  • The Happy Veggie
  • Recipes
  • Animal News
  • Bypass or Buy?
  • My Personal Blog
  • Kitchen, Veggies, and Health
  • Archives
  • VIDEOS

R E C I P E S

Bruschetta with Burrata

6/29/2023

0 Comments

 
Picture
 Bruschetta with Burrata


Prep Time: 15 Min
Cook Time: 10 Min

Yields: 12 Pieces 
Picture

WHAT YOU NEED

  • 350g package Baguettes, halved
  • 226g Burrata
  • 1 1/2 C Grape Tomatoes, chopped
  • 2 cloves Garlic, crushed & minced / pressed
  • 1 Tbsp. Red Onion, finely diced
  • 1 1/2 Tbsp. Fresh Basil, torn
  • EVOO
  • Himalayan Salt
  • Pepper Flakes
  • Fresh Parsley, chopped
  • Balsamic Reduction

DIRECTIONS

  • Preheat your oven to 400 F. Halve the baguettes and drizzle each half with EVOO. Place the baguettes on a sheet pan & in to the oven to warm up for 5 - 7 minutes.
  • In the meantime, add the tomatoes, garlic, red onion, and basil, to a small mixing bowl. Drizzle with EVOO and toss until glossy. Season with salt to taste and set aside.
  • Once the baguettes are warmed through, remove and set on to a wire cooling rack. Spoon the bruschetta on to each baguette and tear up the burrata in to smaller pieces, placing them along the baguette. Season the burrata with a pinch of salt and sprinkle pepper flakes over the entire baguette.
  • Switch the oven to BROIL 500F and broil the bruschetta until the burrata is melty.
  • Remove and allow to cool again for a moment, Transfer to a cutting board and slice in to 6 individual pieces. Drizzle with balsamic reduction before transferring to a serving dish. Sprinkle with fresh parsley / basil & ENJOY!
Picture

HAPPY VEG

0 Comments

Buttery Garlic White Beans

6/27/2023

0 Comments

 
Picture
Buttery Garlic White Beans


Prep Time: 10 Min
Cook Time: 15 - 20 Min

Serves: 4 + Servings
Picture

WHAT YOU NEED

  • 4 Tbsp. Unsalted Butter
  • Splash EVOO
  • 4 cloves Garlic, crushed & minced
  • 1 Shallot, finely diced
  • 2 x 540ml White Beans, drained & rinsed
  • 4 sprigs Fresh Thyme, leaves removed
  • 1/2 C Dry White Wine
  • Splash PC Brand Plant-Based Chikn Broth
  • 4 Tbsp. Fresh Parsley, chopped
  • 1/2 Lemon + , juice
  • 1 x Hard Cheese Rind
  • 1/2 C Grana Padano, shredded
  • 1/2 Tsp. Dried Oregano
  • 1/2 Tsp. Red Pepper Flakes
  • Himalayan Salt & Cracked Pepper To Taste

DIRECTIONS

  • Add the butter, splash EVOO, garlic, dried oregano, pepper flakes, and thyme, to a skillet set to just below medium heat. Once heated, stir and let everything sizzle together for 30 + seconds before adding half the parsley, shallots, and a good pinch of both salt and pepper. Stir and cook 4 - 5 minutes until shallots are tender.​
Picture
Picture
  • Add the white beans, wine, splash of broth, and the hard cheese rind. Season with salt and let the wine come to a bit of a boil. Cover & reduce the heat to a simmer for 10 minutes, stirring occasionally. Remove cover and continue to simmer until the liquid is nearly dried up. It should be nice and creamy at this point.
  • Remove from heat and stir in the remaining parsley, 1/2 lemon's juice, and the grana padano. Season to taste with salt & cracked pepper. If desired, add the remaining half of the lemon's juice for additional lemon flavour. Pluck out the rind prior to serving. Serve each portion with fresh parsley and additional grated grana padano.
  • Serve as a side dish, over toast, or as a stand alone. They're creamy, nutty, and absolutely delicious. Refrigerate any leftovers for up to 4 days. ENJOY!
Picture
Picture
Picture

HAPPY VEG

0 Comments

Waffle Breakfast Sammies

6/24/2023

0 Comments

 
Picture
Waffle Breakfast Sammies


Prep Time: 5 Min
Cook Time: Under 10 Min


Picture

WHAT YOU NEED

  • PER SANDWICH
  • EVOO
  • 2 x Frozen Buttermilk Waffles
  • 1 Large, Free-Range Egg
  • 1 Slice Old Marble Cheddar
  • 1 x Frozen Hashbrown Patty
  • Chipotle Mayonnaise
  • Valentina Hot Sauce 
  • Organic, Pure Maple Syrup
  • Red Pepper Flakes
  • Himalayan Salt & Cracked Pepper
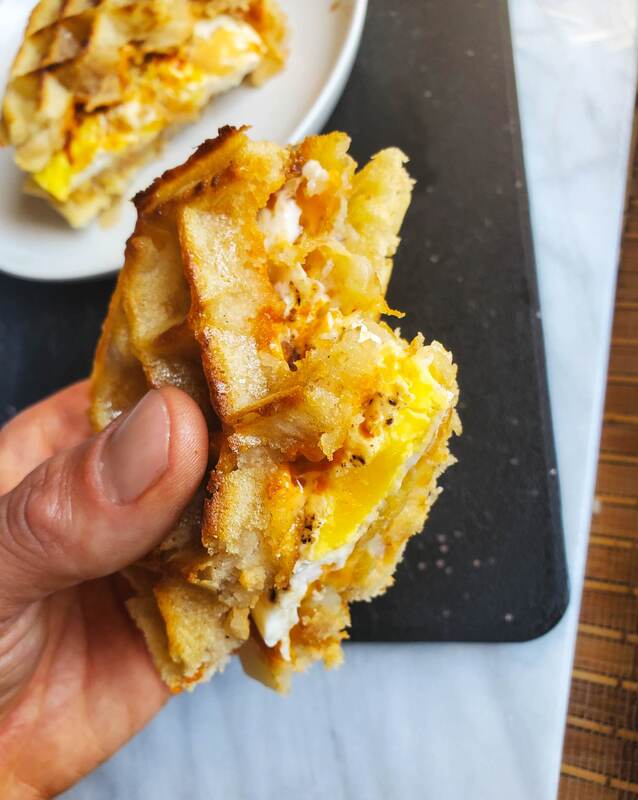
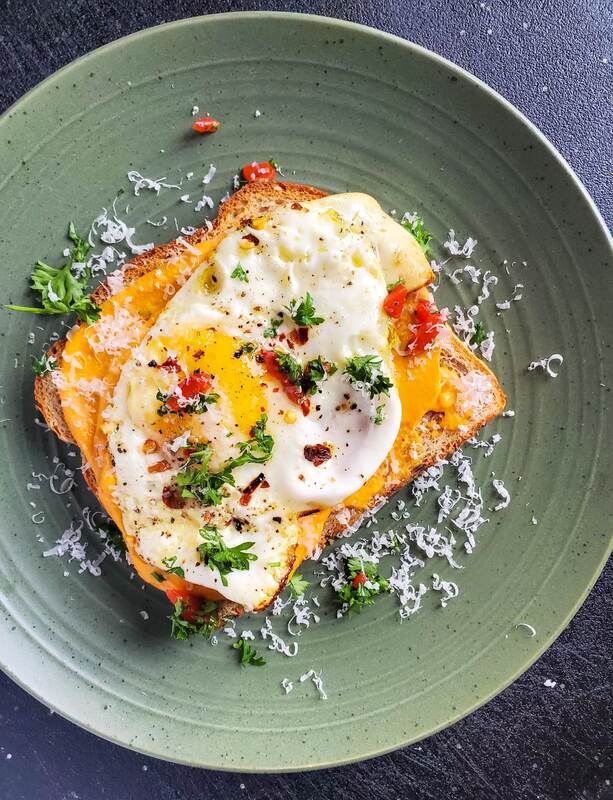
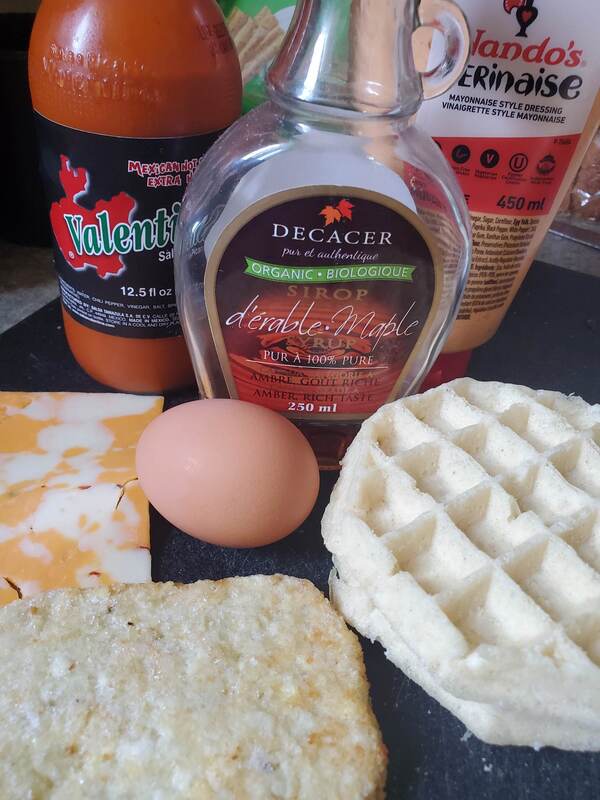
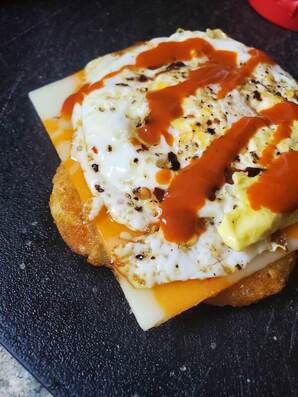
NOTES
1. If you're making more than one, fry up your hash brown patties first, remove, and then fry your eggs. While this is happening, toast however many waffles you need.

2. Sub your favourite hot sauce but trust me, you don't want to skip the hot sauce. It's the perfect thing to cut through both the sweetness of the maple & waffle, and the richness of the egg, cheese, hash combo.

DIRECTIONS

  • Begin heating a couple Tbsp. EVOO in a non-stick skillet set to just below medium. Once heated, add the hash brown patty and season with salt & cracked pepper. Fry until golden, flip, and continue until fully cooked and golden brown. After flipping, crack in your egg, season with salt, cracked pepper, and pep flakes, and cook until set. Flip the egg quickly on to the yolk side and turn off the heat.
  • Toast your waffles until golden and crispy.
  • To assemble, squeeze chipotle mayo on the bottom waffle followed by placing your crispy hash brown, slice of cheddar, and fried over-easy egg. Drizzle with hot sauce and spread chipotle mayo on the top waffle, placing it on top for your sandwich. Drizzle the sandwich with maple syrup, slice in half, and serve. 
  • ENJOY!
Picture
Picture
Picture

HAPPY VEG

0 Comments

Sausage & Roasted Red Pepper Pappardelle Bolognese

6/21/2023

0 Comments

 
Picture
Sausage & Roasted Pepper Pappardelle Bolognese


Prep Time: 20 Min
Cook Time: 2 + Hours

Yields: 4 Servings
Picture

WHAT YOU NEED

  • 8 - 12 Oz. Dry Pappardelle Pasta **
  • 2 Tbsp. Unsalted Butter
  • 1 Tbsp. EVOO
  • 4 cloves Garlic, crushed & minced
  • 1 Yellow Onion, diced
  • 1 Red Onion, diced
  • 1 Large Carrot, peeled & diced
  • 2 stalks Celery, diced
  • 4 x Roasted Red Peppers (store-bought) , diced
  • 4 x Beyond Meat Hot Italian Sausages
  • 6 - 8 Sprigs Thyme, leaves removed
  • Handful Fresh Basil, torn
  • 2 1/2 Tbsp. Tomato Paste
  • 1 C White Wine
  • 3 C PC Plant Based Chikn Broth (sub vegetable broth) ***
  • 1/3 C Whipping Cream, room temp
  • 1 x Hard Cheese Rind (optional)
  • 2 Bay Leaves
  • 1 1/2 Tsp. Dried Oregano
  • 1 Tsp. Red Pepper Flakes
  • 3/4 Tsp. + Himalayan Salt
  • Cracked Pepper
  • Fresh Parsley & Grana Padano - Garnish
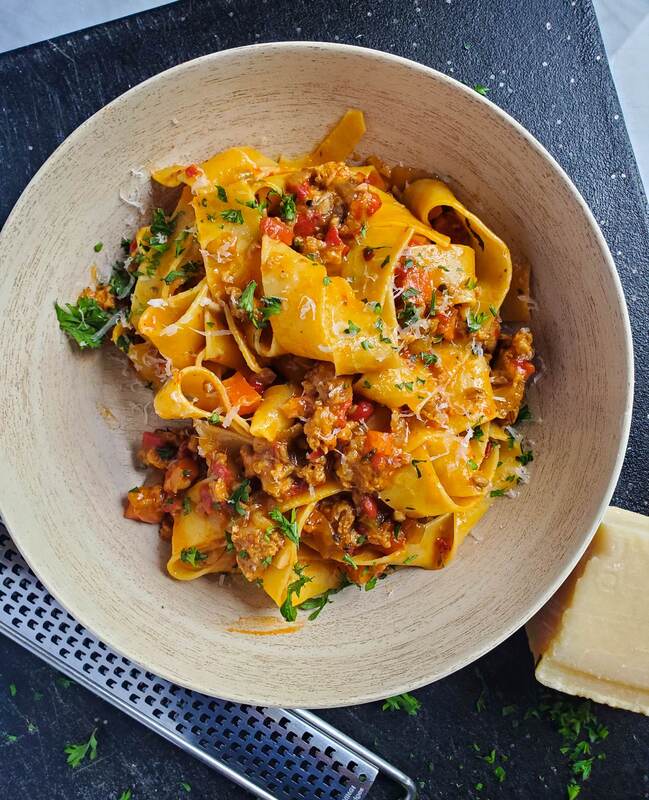
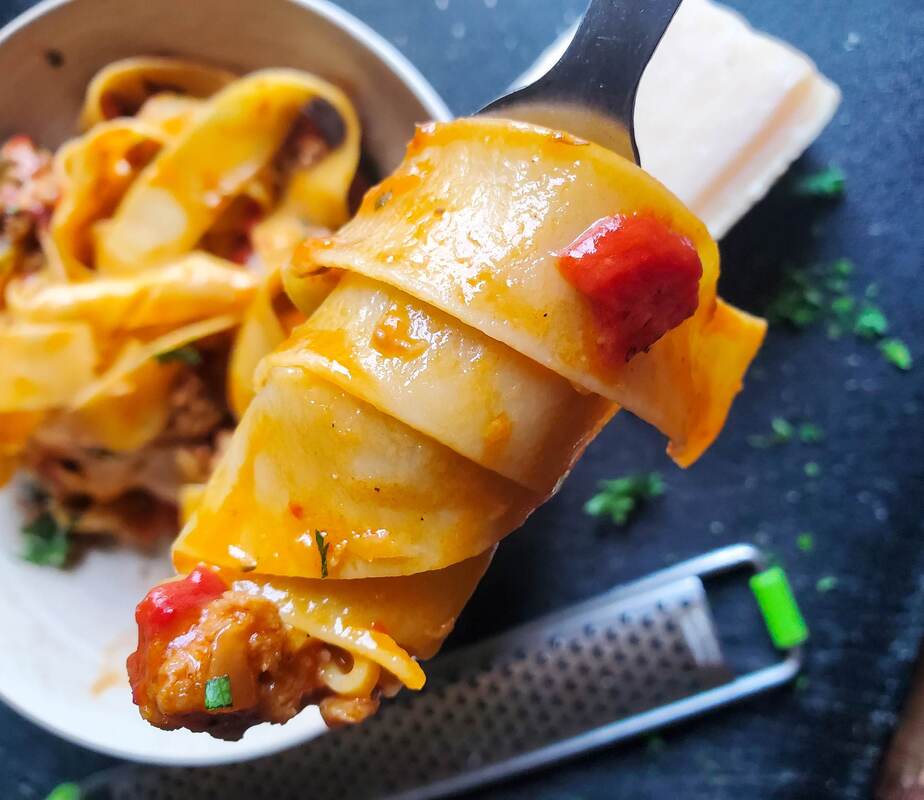
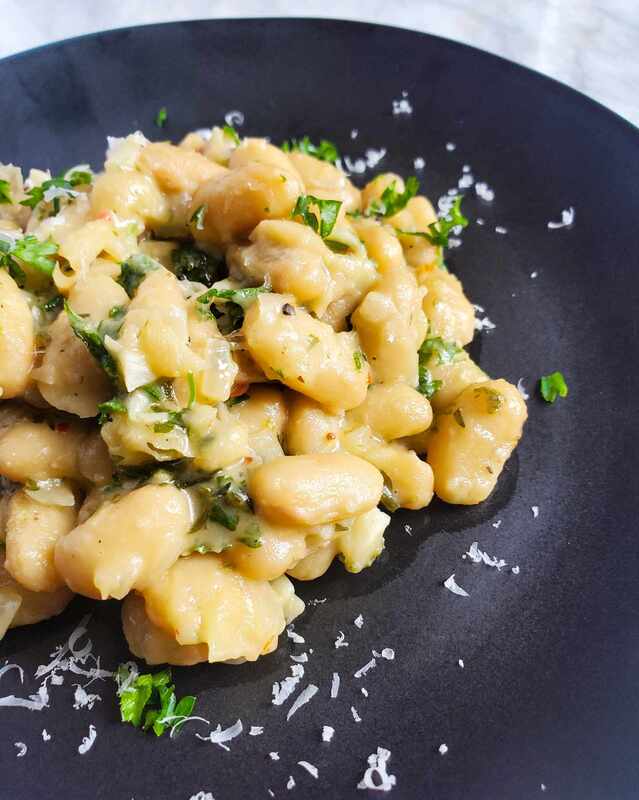
NOTES:
** - A standard serving size of dry pappardelle is 2 ounces per person. I lean more towards three just in case, because I'm always hungry for more pasta. 
*** - I always have President's Choice Plant-Based broths at home. If these are not an option where you're located, sub good vegetable broth and adjust seasonings if needed.

DIRECTIONS

  • Begin heating the EVOO, butter, thyme, dried oregano, garlic, and pepper flakes, in a large skillet set to just below medium. Once heated, let everything sizzle together for 30 + seconds before adding the onions, carrot, roasted pepper, celery, and a generous pinch of salt & cracked pepper. Stir and cook 6 - 7 minutes until veggies have started to go soft.
  • Push the veg to the outside of the skillet and crumble in your Beyond Hot Italian Sausages. Stir and cook, breaking the crumbles down as the sausage browns, about 5ish minutes. Stir everything together before making a well in the center of the skillet and dropping in the torn basil. Let that go for 30 seconds before adding the tomato paste & another good pinch of salt. Stir everything together & let the mixture continue to cook another 2 minutes. ​
Picture
Picture
​
  • Pour in the wine. Let the wine simmer until mostly reduced and then add the cream and broth. Bring your sauce to a boil and once boiled, add the optional hard cheese rind, bay leaves, & 3/4 tsp. salt. Reduce to medium low and simmer uncovered for 1 1/2 - 2 Hours until thick and reduced. Taste and adjust salt if needed.
  • Bring a large pot of cold, salted water to a boil. Once boiled, drop in your pappardelle and cook to al dente. Transfer the cooked noodles to the skillet with the bolognese, bringing some of the pasta water along with you. Toss until noodles are nice and coated, adding more pasta water if needed. Allow the sauce & noodles to simmer together for a couple minutes until pasta is cooked to your liking. 
  • Pluck out the bay leaves & cheese rind if you added it. Taste and adjust seasonings before serving.
  • Serve garnished with fresh parsley and generous amounts of grated grana padano. ENJOY! 
Picture
Picture

HAPPY VEG

0 Comments

RRP Hummus Egg Toasts

6/18/2023

0 Comments

 
Picture
RRP Hummus Egg Toasts


Prep Time: 15 Min
Cook Time: 10 Min

Yields: 4 Servings
Picture

WHAT YOU NEED

  • Roasted Red Pepper Hummus Recipe - www.thehappyveg.ca/recipes/roasted-red-pepper-hummus
  • 4 Pieces Multigrain Bread or Sourdough
  • Soft Unsalted Butter
  • EVOO
  • 4 x Large, Organic, Free-range Eggs
  • Fresh Parsley, finely chopped
  • Grana Padano
  • Himalayan Salt & Cracked Pepper 
  • Pepper Flakes
  • OPTIONAL - 1/2 Roasted Red Pepper, minced

DIRECTIONS

  • Follow the link in the ingredients list to my Roasted Red Pepper Hummus recipe. Prepare and set aside. If you've made in in advance, take it out of the fridge while you set everything up so it leans more towards room temp than refrigerated.
  • Begin heating some EVOO in a non-stick skillet set to a smidge below medium. Let it heat up before carefully cracking in the 4 eggs. Season eggs with salt, pepper, and pepper flakes, and cook until whites are set. To avoid yolks overcooking, baste your egg white with the hot oil in the skillet to speed up their cooking.
  • Toast your bread of choice and give it a good slathering of unsalted butter. Spread each slice with a generous amount of the roasted red pepper hummus, followed by the fried egg, a sprinkling of fresh parsley, some nutty grana padano, and the optional diced roasted red peppers. ENJOY
Picture

HAPPY VEG

0 Comments

Roasted Red Pepper Hummus

6/16/2023

0 Comments

 
Picture
Roasted Red Pepper Hummus


Prep Time: 10  Min

WHAT YOU NEED

  • 540ml Salt Free Chickpeas, drained & rinsed
  • 1 Large clove Garlic, crushed
  • 1 x Roasted Red Pepper
  • 4 Tbsp. EVOO
  • 2 Tbsp. Roasted Red Pepper Liquid
  • 2 Tbsp. Water
  • 1/2 Tbsp. + Lemon Juice 
  • 1 Heaping Tbsp. Tahini
  • 1/4 Tsp. Red Pepper Flakes
  • 1/2 Tsp. Himalayan Salt
  • Parsley, chopped for garnish
Picture

DIRECTIONS

  • Add everything to your blender and blend until smooth and creamy. Add additional EVOO if needed to help finish the blend until the hummus is smooth. Taste and adjust salt / lemon juice if desired.
  • Transfer to a serving dish. Drizzle with EVOO and sprinkle some red pepper flakes, chopped parsley, & chopped roasted red pepper (optional).
  • Serve up with naan dippers, your fave crackers, or fresh produce like cucumbers or carrots. ENJOY!
Picture

HAPPY VEG

0 Comments

"Beef" & Rice Ranch Blasted Tacos

6/13/2023

0 Comments

 
Picture
"Beef" & Rice Ranch Blasted Tacos


Prep Time: 20 Min
Cook Time: 20 - 25 Min

Yields: 8 - 10 Tacos
Picture

WHAT YOU NEED

  • 8 - 10 Old El Paso Ranch Blasted Stand & Stuff Shells
  • 398ml Old El Paso Refried Black Beans
  • 215g Old El Paso Mexican Rice
  • 340g Beyond Meat Beef
  • EVOO
  • 2 cloves Garlic, crushed & minced
  • 1 Yellow Onion, diced
  • 2 Tsp. Mexican Chili Powder
  • 1 Tsp. Cumin
  • 1 Tsp. Clubhouse Tex Mex Seasoning
  • 1/2 Tsp. Garlic Powder
  • 1/2 Tsp. Onion Powder
  • 1/2 Tsp. Dried Oregano
  • 1/4 Tsp. Red Pepper Flakes
  • 1/2 Tbsp. Tomato Paste
  • Splash PC Plant-Based Broth 
  • 1 C Old White Cheddar, shredded
  • 1 - 2 Heads Romaine, thinly sliced
  • 1 - 2 Roma Tomatoes, diced
  • Fresh Cilantro
  • Hot Sauce
  • Himalayan Salt

DIRECTIONS

  • Empty the refried beans in to a small, covered pot and set to low. Heat until needed.
  • Prepare the Old El Paso Mexican Rice as per package directions.
Picture

  • While the rice cooks, prepare the beef filling. Set the heat to just below medium & begin heating a tbsp. or so of EVOO in a skillet along with the garlic and pepper flakes. Once heated, let everything sizzle together for 30 seconds or so before adding the onion and a good pinch of salt. Stir and cook until onion is soft. Add the Beyond Meat Beef and break it up in to smaller cr4umbles as it sizzle in the skillet. Once crumbled, sprinkle in all of your seasonings and stir to coat everything evenly. Continue to cook another minute or so before adding the tomato paste and a splash of water or broth. Stir and let that continue until liquid is absorbed and beyond beef is cooked through. Season with salt, taste, and adjust salt if needed.
  • For service, stuff your shells with a smear of refried beans, a scoop of the Old El Paso rice, and some of your beefy filling. Top with shredded romaine, diced tomatoes, shredded white cheddar, fresh cilantro, and your favourite hot sauce. ENJOY!
Picture
Picture

HAPPY VEG

0 Comments

Horiatiki Salad

6/10/2023

0 Comments

 
Picture
Horiatiki Salad


Prep Time: 15 Min


Yields: 3 - 4 Servings
Picture

WHAT YOU NEED

  • 3 Roma Tomatoes, chopped
  • 1/2 Red Onion, chopped
  • 1 Green Bell Pepper, sliced in to rounds
  • 1 English Cucumber,  halved & cut in to half moons
  • Kalamata Olives (desired amount), pitted
  • 140g Feta Cheese
  • 1/4 C Fresh Parsley, roughly chopped
  • 1 Heaping Tbsp. Fresh Dill, roughly chopped
  • EVOO
  • Red Wine Vinegar
  • 1 Tsp. Dried Oregano
  • Himalayan Salt & Cracked Pepper
  • Red Pepper Flakes
  • Pickled Pepperoncini Peppers
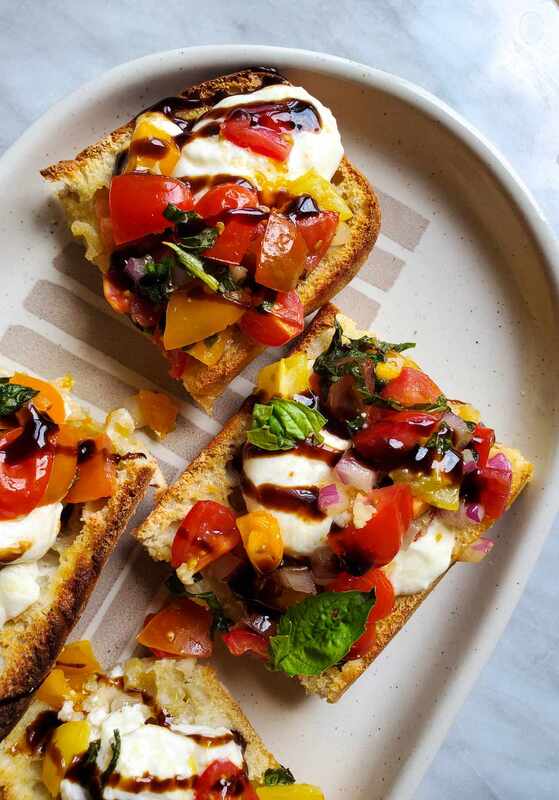
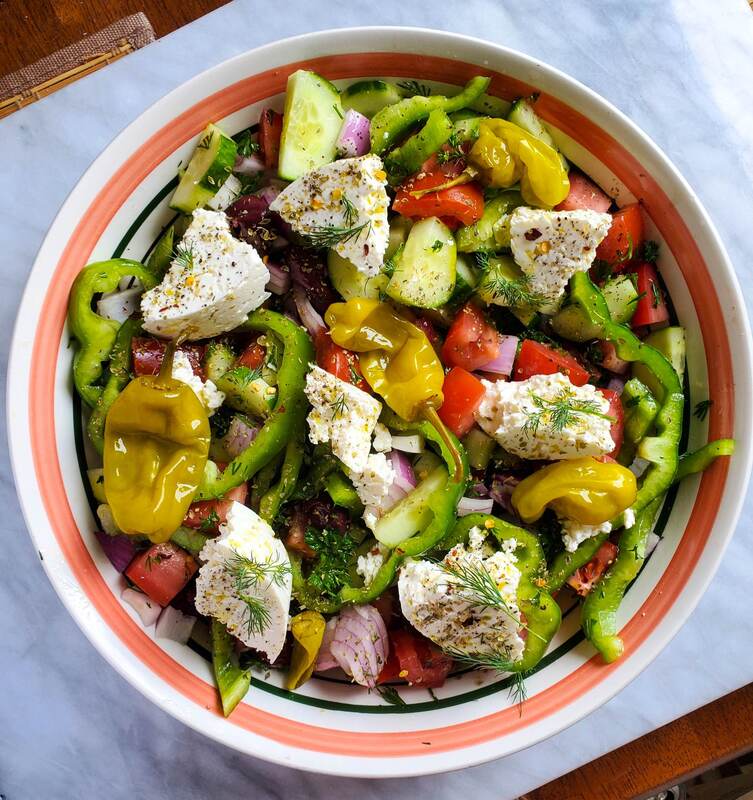
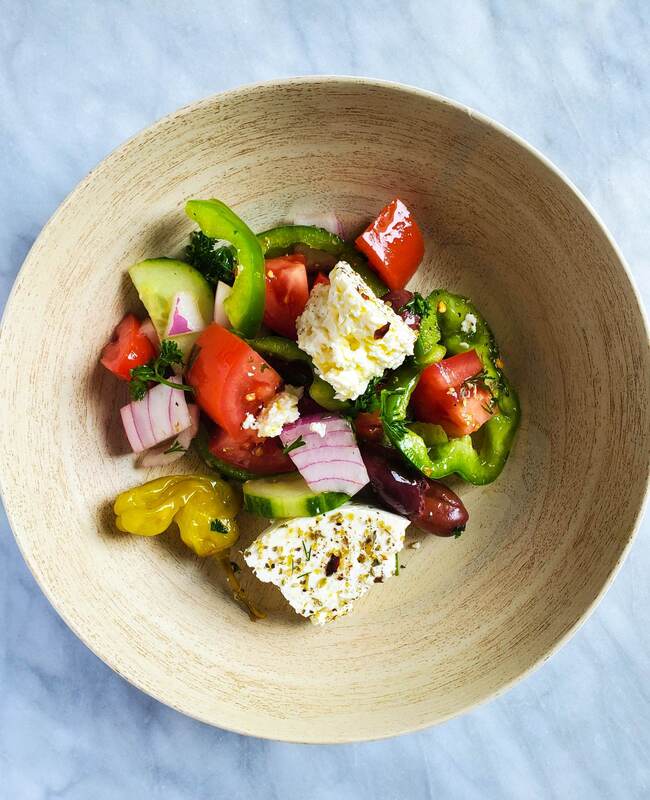
NOTES:
1. Because there are so few ingredients, it's important to use the freshest ingredients to really let this salad shine. Make sure your produce is crisp & fresh.

2. Make sure your red wine vinegar and EVOO are of good quality as well. You don't want no name vinegar when the vin is the star of the dish. Keep this in mind. Good quality EVOO makes a world of difference.

3. For the FETA, you can serve it in chunks as I did, or in one large piece set in the center of the salad. 

DIRECTIONS

  • Get all of your veggies & herbs chopped, and add them to your serving bowl. Dress them with EVOO & Red Wine Vinegar to taste, sprinkle in your dried oregano, cracked pepper, salt, and pepper flakes to taste. Toss gently to combine.
  • Break your feta in to large chunks and place them around the salad dish. Drizzle the feta with EVOO and season each chunk with a little cracked pepper, dried oregano, and pepper flakes.
  • Place pepperoncini peppers around the dish and finish with fresh dill fronds for garnish.
  • Serve and ENJOY! Salad can be refrigerated for 4ish days in an airtight container.
Picture
Picture

HAPPY VEG

0 Comments

Egg Salad Baguettes

6/7/2023

0 Comments

 
Picture
Egg Salad Baguettes


​
Prep Time: 15 Min
Cook Time: 10 Min

Yields: 4 Baguettes


Picture

WHAT YOU NEED

  • 2x 150g White Baguettes (Or, 4 individual baguettes)
  • 6 Large Free-Range Eggs
  • 1/2 Red Onion, diced
  • 1 stalk Celery, diced
  • 2 Green Onions, sliced
  • 2 Tbsp. Fresh Dill, chopped
  • 2 Tbsp. Fresh Parsley, chopped
  • 1/4 C Mayonnaise
  • Splash Lemon Juice
  • 1 Tsp. Dijon Mustard
  • 1/4 Tsp. White Sugar
  • 1/2 Tsp. Dry Mustard Powder
  • 1/4 Tsp. Sea Salt
  • Cracked Pepper
  • Fresh Romaine
  • Sliced Dill Pickles
  • Soft Butter / Margarine

DIRECTIONS

  • EGG SALAD - Fill a medium sized pot with enough cold water to cover the eggs by about an inch. Carefully add the eggs and set the pot on to the burner at medium high heat. Once boiled, let the eggs go for 4 minutes. Remove from heat, cover, and let them sit for 5 - 7 minutes. Strain eggs to an ice bath and let them chill for a couple minutes before shelling them.
  • Cut the eggs in half and scoop the yolks in to a mixing bowl reserving one yolk for the end. Mash the yolks with a fork and whisk them together with the mayo, dijon, mustard powder, lemon juice, sugar, salt, and pepper until thoroughly combined and smooth.
  • Next, add your celery, red & green onion, dill,  & parsley to the bowl. Dice the egg whites and add those to the bowl as well. Toss everything together until combined. Don't be afraid to add more mayo if you desire.
  • Transfer the egg salad to a serving bowl and crumble the reserved egg yolk over the salad. Refrigerate covered for an hour or so to firm up and let the flavours meld together.​
Picture
Picture
  • To prepare the baguette sandwiches, slather your baguettes with butter / margarine and toast in a skillet until golden brown. To serve, start by laying some sliced romaine on the bottom half of the baguette. Spoon desired amount of egg salad on to your baguettes followed by 3 - 4 slices of crispy dill pickle, and more romaine to finish.
  • Serve and ENJOY!
Picture

HAPPY VEG

0 Comments

Cheesy Cauliflower Risotto with Roasted Calabrian Chili Cauliflower

6/6/2023

0 Comments

 
Picture
Cheesy Cauliflower Risotto
with Roasted Calabrian Chili Cauliflower


Prep Time: 20 Min
Cook Time: 45 Min

Yields: 4 Servings
Picture

WHAT YOU NEED

  • 1 Head Cauliflower, half chopped in to large florets, the other half finely chopped
  • RISOTTO
  • 1 C Arborio Rice
  • 1 Tbsp. Unsalted Butter
  • 1 Tbsp. EVOO
  • 1 Yellow Onion, finely diced
  • 3 cloves Garlic, crushed & minced
  • 6 sprigs Fresh Thyme leaves removed
  • 1 C Dry White Wine
  • 1 L Pres Choice Plant-Based Chikn Broth
  • 1 C Extra Old Aged White Cheddar, shredded
  • 1/2 C Aged Gouda, shredded
  • 1/2 Tsp. Red Pepper Flakes
  • Himalayan Salt To Taste
  • Cracked Pepper
  • Fresh Parsley
  • ROASTED CAULI
  • Vegetable Oil
  • 4 Tbsp. Calabrian Chili Pesto
  • 1/2 Lemon, juice
  • Himalayan Salt

DIRECTIONS

  • ROASTED - Preheat oven to 425 F
  • In a medium sized mixing bowl, add the pesto, lemon juice, large florets, and enough vegetable oil to allow the mixture to spread between the florets. Use your hands to work the pesto in to all of the florets before transferring them to a parchment lined baking sheet. Season liberally with Himalayan salt and cover with tinfoil.
  • Bake 30 minutes covered. Remove cover, flip, and continue to cook another 15 or so minutes until some charring has occurred and florets are tender. Taste and season with additional salt to taste.​
Picture
Picture
  • RISOTTO - In the meantime, empty the entire carton of broth in to a small covered pot and bring to a boil. Once boiled, leave covered and reduce to low.
  • Begin melting the butter & EVOO, pepper flakes, garlic, and thyme together in a large, 12" skillet set to about medium heat. Once heated, let everything sizzle for 30 seconds or so before adding the onions and a good pinch of salt. Stir and cook for 4 ish minutes. Add the finely chopped florets and a good pinch of salt. Stir and cook 5 - 7 minutes until florets have started to go soft. Add the dry rice, stir, and continue to stir and cook until rice goes opaque and the germ is visible.​
Picture
Picture
  • Pour in the wine and let that simmer until mostly reduced. Now, add a ladleful of broth and simmer until broth is reduced, continuing 4 - 5 times until rice is plump, and cooked but still having retained a bit of bite. 
  • Remove from heat and stir in the cheddar & gouda until fully incorporated. Season to taste with salt and some cracked pepper.
  • For service, serve a scoop of the creamy risotto with some of the roasted cauliflower on top. Finish with some fresh parsley, finely shredded aged cheddar, and a sprinkling of pepper flakes. ENJOY!
Picture

HAPPY VEG

0 Comments
<<Previous

    Archives

    July 2025
    June 2025
    May 2025
    April 2025
    March 2025
    February 2025
    January 2025
    December 2024
    November 2024
    October 2024
    September 2024
    August 2024
    July 2024
    June 2024
    May 2024
    April 2024
    March 2024
    February 2024
    January 2024
    December 2023
    November 2023
    October 2023
    September 2023
    August 2023
    July 2023
    June 2023
    May 2023
    April 2023
    March 2023
    February 2023
    January 2023
    December 2022
    November 2022
    October 2022
    September 2022
    August 2022
    July 2022
    June 2022
    May 2022
    April 2022
    March 2022
    February 2022
    January 2022
    December 2021
    November 2021
    October 2021
    September 2021
    August 2021
    July 2021
    June 2021
    May 2021
    April 2021
    March 2021
    February 2021
    January 2021
    December 2020
    November 2020
    October 2020
    September 2020
    August 2020
    July 2020
    June 2020
    May 2020
    April 2020
    March 2020
    February 2020
    January 2020
    December 2019
    November 2019
    October 2019
    November 2018
    October 2018
    September 2018
    August 2018
    July 2018
    June 2018
    May 2018
    April 2018
    March 2018
    February 2018
    January 2018
    December 2017
    November 2017
    October 2017
    September 2017
    August 2017
    July 2017
    June 2017
    May 2017
    April 2017
    March 2017
    February 2017
    January 2017
    December 2016
    November 2016
    October 2016
    September 2016
    August 2016
    July 2016
    June 2016
    May 2016
    April 2016
    March 2016
    February 2016
    January 2016
    December 2015
    November 2015
    October 2015
    September 2015
    August 2015
    July 2015
    June 2015
    May 2015
    April 2015
    March 2015
    February 2015
    January 2015
    December 2014
    November 2014

    Jonathan - Happy Veg

    Recipes that everyone in the house will love, guaranteed.

    Categories

    All

Proudly powered by Weebly
Photos from Marcus Bichel Lindegaard, JeepersMedia, regan76, Kjokkenutstyr.net, Muffet, wuestenigel
  • The Happy Veggie
  • Recipes
  • Animal News
  • Bypass or Buy?
  • My Personal Blog
  • Kitchen, Veggies, and Health
  • Archives
  • VIDEOS