HAPPY VEG
  • The Happy Veggie
  • Recipes
  • Animal News
  • Bypass or Buy?
  • My Personal Blog
  • Kitchen, Veggies, and Health
  • Archives
  • VIDEOS

R E C I P E S

Sundried Tomato Pesto Orecchiette

4/30/2024

0 Comments

 
Picture

Sundried Tom Pesto Orecchiette


Prep Time: 20 Min
Cook Time: 20 - 25 Min

Yields: 4 Servings
Picture

WHAT YOU NEED

  • SUNDRIED TOM PESTO RECIPE www.thehappyveg.ca/recipes/sundried-tomato-pesto
  • 400g Dry Orecchiette Pasta
  • 1/4 C EVOO
  • 1/2 Tbsp. Pepperoncini In Oil
  • 3 cloves Garlic, crushed & minced
  • 1 Yellow Onion, finely diced
  • 1 C White Wine ( I used Pinot Grigio)
  • 1/2 C Grana Padano, finely shredded
  • 1/2 Lemon, juice
  • Pasta Water
  • Himalayan Salt & Cracked Pepper
  • GARNISH - Fresh Parsley, Fresh Basil, Grana Padano

DIRECTIONS

  • Bring a large pot of cold, heavily salted water to a boil and leave covered.
  • Prepare the pesto according to the provided recipe and set aside.
  • Begin heating the EVOO, garlic, and pepperoncini, in a large skillet set to just below medium heat. Once heated, stir and let the garlic sizzle for about 30 seconds without browning. Add the onion and a good pinch of both salt & cracked pepper. Stir and cook 5 minutes approximately until onions are almost tender.​
Picture
Picture
  • Pour in the wine and season again with salt. At this time, add your pasta to the boiling water. Simmer the wine until it has reduced by about 2/3 at which point you'll add a ladle of the hot pasta water to continue simmering. 
  • Once the orecchiette is just about al dente perfection, strain it directly to the skillet. Add the entire batch of pesto along with a full ladle of hot pasta water. Toss over the heat until all of the pasta is coated in the pesto sauce. Continue to toss and cook until orecchiette is perfectly cooked. 
  • Turn off the heat and add the lemon juice, grana padano, and another good ladle of hot pasta water. Toss until creamy and combined. taste and adjust salt if needed / desired.
  • Serve garnished with fresh parsley and / or basil and a good dusting of grana padano. ENJOY!
Picture
Picture
Picture

HAPPY VEG

0 Comments

Artichoke & Sundried Tomato Spaghetti

4/28/2024

0 Comments

 
Picture

Artichoke & Sundried Tom Spaghetti


Prep Time: 15 Min
Cook Time: 20 Min

Yields: 4 Servings 
Picture

WHAT YOU NEED

  • 400g Dry Spaghetti 
  • 2 Tbsp. Unsalted Butter
  • 2 Tbsp. EVOO
  • 1/2 Tbsp. Pepperoncini In Oil
  • 4 cloves Garlic, crushed & minced
  • 1 Yellow Onion, finely diced
  • Handful Fresh Basil, roughly chopped
  • 1/4 C Sundried Tomatoes, chopped
  • 398ml can Artichoke Hearts, drained, rinsed, and chopped
  • 1 Lemon, zest & juice
  • 1/2 C Grana Padano, finely shredded
  • Pasta Water
  • Himalayan Salt & Cracked Pepper
  • GARNISH - Parsley, Basil, Grana Padano

DIRECTIONS

  • Bring a large pot of generously salted water to a boil. Leave covered.
  • Begin heating the butter, EVOO, pepperoncini, and garlic, in a large skillet set to just below medium. Once heated, let everything sizzle together for about 30 seconds before adding the onion and a good pinch of both salt & pep. Stir and cook 4ish minutes.
  • Add the basil, sundried tomatoes, artichokes, and another generous pinch of both salt & pepper. Stir and continue to cook another 4 minutes. Add your spaghetti to the boiling water and after a minute or so, take about 2/3 C of the pasta water and add it to the skillet to keep things simmering. You may need another 1/2 c or so until the pasta is just about al dente.​
Picture
Picture
  • Once your spaghetti is almost perfectly al dente, strain it directly in to the skillet. Start tossing the spaghetti repeatedly to release starches and finish cooking. Once the pasta is al dente perfection, shut off the heat, add the lemon zest, grana padano, and another good ladle of the hot pasta water. Continue to toss until emulsified and glossy. Season to taste with S & P.
  • Garnish the skillet with fresh basil & parsley prior to service. Garnish each serving with fresh parsley / basil and a generous dusting of finely grated grana padano. ENJOY!
Picture
Picture
Picture

HAPPY VEG

0 Comments

Sundried Tomato Pesto

4/26/2024

0 Comments

 
Picture

Sundried Tomato
Pesto


Prep Time: 5 Min
Cook Time: 2 - 3 Min

Picture

WHAT YOU NEED

  • 1/4 C Pine Nuts
  • 1 Tbsp. Hemp Hearts
  • 1/3 C Grana Padano (Sub Parm, Pecorino if needed)
  • 3 - 4 Tbsp. EVOO
  • 1/2 Tbsp. Pepperoncini In Oil
  • 3 x Sundried Tomatoes from the Jar
  • 2 cloves Garlic, crushed
  • 1/2 Large Lemon
  • 1 C Fresh Basil
  • 1/4 C Fresh Parsley (including stems)
  • 1/4 Tsp. + Himalayan Salt

DIRECTIONS

  • Get the pine nuts in a dry skillet set to just below medium, and once heated, stir as needed until they're golden and toasted. Be careful, they can burn very easily so keep an eye on them. Remove them from the heat immediately and transfer them to a small bowl.
  • Add everything to a small vortex blender starting with 3 Tbsp. EVOO and whiz until emulsified. Add additional oil if needed until the pesto comes together. Taste and adjust your salt / lemon if desired.
  • Use immediately for a lovely pasta dish, spread, or an addition to a soup / sauce. Store in an airtight container in the fridge for up to four days.
Picture
Picture
Picture

HAPPY VEG

0 Comments

Cheesy Baked Cauliflower

4/24/2024

0 Comments

 
Picture

Cheesy Baked Cauliflower


Prep Time: 15 Min
Cook Time: 50 - 55 Min

Yields: 3 - 4 Servings 
Picture

WHAT YOU NEED

  • 1 Small Head Cauliflower, chopped in to large florets. (About 5 C)
  • 1 Jalapeno Pepper, sliced in to rings
  • 2 Tbsp. Unsalted Butter
  • 1/2 Tsp. Red Pepper Flakes
  • 1 1/2 Tbsp. All Purpose Flour
  • 3/4 C 2% Milk, room temp
  • 3/4 C Whipping Cream, room temp
  • 3/4 C + 1/2  C Extra Old White Cheddar, shredded m& divided
  • 1/2 Tsp. + Himalayan Salt
  • Cracked Pepper
  • Nutmeg
  • 1/4 C Panko Crumbs
  • 1/4 C Grana Padano, finely shredded
  • Himalayan Salt & Cracked Pepper
  • Fresh Parsley

DIRECTIONS

  • Bring a large pot of cold water to a low boil and add your florets. Boil about 7 minutes or until the florets are starting to get tender. Strain and finish your sauce.
  • Heat the butter & pepper flakes in a small pot set to just about medium heat. Once melted and bubbly, stir in the flour until combined, reduce the heat slightly, and let the roux bubble away for a minute and a half or so without browning. At this point, pour in the milk & cream and wait for the mixture to start bubbling. Reduce the heat to medium low, season with the 1/2 Tsp. salt, some cracked pepper, and a dash or two of nutmeg, and simmer 3 - 4 minutes until thick and creamy. Taste to ensure the raw flour flavour has been cooked out. If not, let it go another minute or two.
  • Turn off the heat and fold in the 3/4 C cheddar until combined. Taste your sauce and adjust salt / pepper if desired.​
Picture
Picture
  • Preheat oven to 375 F
  • Spray a 7' x 11' baking dish with cooking spray and arrange the cauliflower in the dish. Pour the creamy sauce over the cauliflower, making sure to cover each floret in the sauce. Top with the 1/2 C cheddar.
  • In a small bowl, add the crumbs, grana, and a pinch of both salt and pepper. Add a Tbsp. of EVOO to stgart and work the mixture together with your fingers until crumbly and moist. Add additional oil if needed. Sprinkle this on top of the creamy cauliflower. Finish with the sliced jals.
  • Bake uncovered for 40 - 45 minutes until florets are tender and sauce is bubbly. If desired, switch the oven to BROIL HIGH / 500 F to finish with a little more golden brown colour on top.
  • Serve and garnish your servings with finely shredded grana padano and fresh parsley. ENJOY!
Picture
Picture
Picture

HAPPY VEG

0 Comments

Pesto Risotto with Burrata & Roasted Grape Tomatoes

4/22/2024

0 Comments

 
Picture

Pesto Risotto
With Burrata & Roasted Tomatoes

Prep Time: 20 Min
Cook Time: 25 - 30 Min

Yields: 2 Main / 4 Sides
Picture

WHAT YOU NEED

  • 1 C Dry Arborio Rice
  • 1 L PC Brand Plant-Based Chik'n Broth
  • 1/4 C EVOO
  • 2 cloves Garlic, crushed & minced
  • 1 Small yellow Onion, finely diced
  • 1 C White Wine
  • 1 x Hard Cheese Rind
  • Himalayan Salt & Cracked Pepper
  • 1/2 283g container Grape Tomatoes, halved + EVOO, Himalayan Salt, Red Pepper Flakes
PESTO
  • 1 C Fresh Basil (stems & leaves)
  • 1/4 C Fresh Parsley (stems & leaves)
  • 1/4 C Pine Nuts 
  • 3 Tbsp. + EVOO
  • 2 cloves Garlic, crushed & peeled
  • 1 Tbsp. Hemp Hearts
  • 1/2 - 1 Lemon, juice
  • 1/3 C Pecorino, finely shredded
  • 1/4 Tsp. + Himalayan Salt
  • Cracked Pepper 
  • Pinch Red Pepper Flakes
GARNISH
  • Burrata, Pepper Flakes, Balsamic Reduction, Pecorino, Fresh Basil

DIRECTIONS

  • Add all of the ingredients for the pesto to a small blender and blend until smooth and combined. Start with half a lemon and 3 Tbsp EVOO but add additional liquid if needed to emulsify. Taste and adjust salt / lemon to taste. Transfer to a small bowl and set aside.
  • Empty the broth in to a small covered pot and bring to a boil. Once boiled, reduce to medium low and leave covered.
  • TOMS - Preheat your oven to 425 F. Add the grape tomatoes to a parchment lined baking sheet, drizzle them with EVOO, and season with salt & pepper flakes. Bake 15 - 20, flipping a few times until shriveled with a little charring action. ​
Picture
Picture
  • Begin heating the EVOO, garlic, and pepper flakes, in a 10" skillet set to just about medium. Once heated, stir and let sizzle for 30 ish seconds before adding the onion and a good pinch of both salt and pepper. Stir and let the onion cook about 4 minutes, stirring as needed. Add the arborio rice, stir, and let the rice toast up until opaque with the germ visible within the grains. 
  • Pour in the wine and let the wine simmer until reduced almost entirely. Once the wine has disappeared, ladle in your first ladle of broth, add a pinch of salt, and drop in the cheese rind. Continue to add broth / salt and cook until absorbed / reduced until the rice is ALMOST perfectly cooked. At this point, add one more full ladle and reduce by about half. Pluck out the cheese rind and stir in the entire batch of pesto until everything is combined. Remove the risotto from the heat and let set for a couple minutes. Taste and adjust salt / pepper if needed / desired.
  • Serve up the risotto and nestle burrata on top. Open the burrata, drizzle it with EVOO and season with salt, pepper, and pep flakes. Next, spoon some of the roasted tomatoes over the risotto followed by grated pecorino, balsamic reduction, pepepr flakes, and fresh basil. ENJOY!
Picture
Picture
Picture
Picture
Picture

HAPPY VEG

0 Comments

Scotch Eggs

4/21/2024

0 Comments

 
Picture

Scotch Eggs


​

Prep Time: 15 Min
Cook Time: 15 - 20 Min

Yields: 2 Scotch Eggs
Picture

WHAT YOU NEED

  • 2 Large, Free-Range Eggs (Local is Best)
  • 2 x Beyond Meat Hot Italian Sausages
  • 1/2 C Plain Italian Breadcrumbs
  • 1/2 C All Purpose Flour
  • 1 Large, Free-Range Egg + Cold Water
  • Oil For Frying
  • Himalayan Salt & Cracked Pepper
  • Fresh Parsley
  • Serve With - Something Pickled - Onions, Pepperoncini, Hot Pepper Rings

DIRECTIONS

  • Add your eggs to a pot and cover them by about an inch with cold water. Bring to a boil and once boiled, let them go for 4 minutes. Remove the pot from the heat and cover the eggs for 4 minutes. Strain the eggs to an ice bath to cease and further cooking. Once cooled, carefully peel the eggs leaving them whole and in tact.
  • Next, take your sausages and smash them out on your cutting board. Once you have it smashed out, place the patty in your hand and cup it in your palm. Place the egg in the center and start folding the sausage meat around the egg until sealed. Complete both and set them on a parchment lined tray.​
Picture
Picture
​
  • Set up one plate with the flour, one with the plain crumbs, and a bowl with the egg and a splash of water, whisked together. Season the egg with salt & pepper. Once ready, roll your scotch eggs in the flour, shaking off excess. Dip in the egg and roll in the crumbs until nice and coated. Transfer them again to the same parchment lined tray.
  • Preheat your desired oil of choice in a pot deep enough to cover the eggs entirely. You're looking to get to about 370 - 375 F. Once heated and ready, drop your scotch eggs in very carefully, one at a time. They're going to need about 3 minutes per side until golden brown on both sides. Transfer them to a paper towel lined plate and season them liberally with Himalayan salt.
  • Cut in half and serve immediately garnished with parsley and a sprinkle of salt. Many sites recommended something pickled and all I had was pepperoncini, but I'd suggest some nice pickled onions and a side salad to round things out. ENJOY!
Picture
Picture
Picture

HAPPY VEG

0 Comments

Whipped Feta with Cheesy Roasted Brussels

4/19/2024

0 Comments

 
Picture

Whipped Feta
with Cheesy Roasted Brussels


Prep Time: 20 Min
Cook Time: 20 - 25 Min

Yields: 2 - 3 Servings 
Picture

WHAT YOU NEED

  • 1 Lb. Brussel Sprouts, trimmed and 1/2'd
  • 1/3 C Unsalted Butter
  • 1 Tsp. Red Pepper Flakes
  • 3/4 Tsp. Vegeta Seasoning
  • Cracked Pepper
  • 1/2 C Pecorino, finely shredded
  • 1/4 C Pizza Mozzarella, shredded
FETA
  • 200g Feta Cheese
  • 1 Lemon
  • EVOO
  • Salt To Taste
GARNISH 
  • Lemon Zest
  • Chili Oil
  • Fresh Parsley
  • Pecorino

DIRECTIONS

  • Preheat oven to 400 F. Add the butter, and pepper flakes to a parchment lined baking sheet and throw it in the oven while it preheats. Once preheated, remove the tray with the bubbling butter and sprinkle over the pecorino, vegeta, and some cracked pepper, spreading it as best you can to form a cheesy layer. Nestle the brussels cut side down in to the cheesy butter until the tray is full. Sprinkle the mozz over the top and place in to the oven to bake for 20 - 25 minutes until brussels are tender and cheese is browned and melty. Season the tray with a pinch of salt but don't overdo it as the feta will be salty.
Picture
Picture
Picture
​NOTE
  • The cheese ends up being rather browned and kind of crisp which I enjoyed. If you want that mozzarella a bit more gooey & melty, sprinkle it on half way through the cook time to keep it meltier!
  • In the meantime, zest your lemon and set the zest aside. Add your feta and the juice from the lemon to a food processor along with a couple Tbsp. EVOO to start. Turn on and as it processes, continue to pour in EVOO until the feta is creamy and emulsified. Small little lumps are ok! Taste and season with salt if desired / needed but feta is inherently salty, so be careful not to oversalt!
  • Spread the creamy feta on your serving dish of choice. Top with the cheesy roasted brussels followed by a drizzle of chili oil. Sprinkle the lemon zest over the dish along with some freshly chopped parsley and desired amount of grated pecorino. Swipe the cheesy brussels through the whipped feta and ENJOY!
Picture
Picture

HAPPY VEG

0 Comments

Roasted Tater Tacos with Corn Salsa

4/16/2024

0 Comments

 
Picture

Potato Tacos with Corn Salsa


​Prep Time: 20 Min
Cook Time: 25 - 30 Min

Yields: 6 - 10 Tacos 
Picture

WHAT YOU NEED

  • Corn Tortillas
  • 398ml can Refried Beans with Chilis
  • 2 Russet Potatoes, peeled & cut in to about 1/2" cubes
  • EVOO
  • Potato Seasonings - 1 Tsp. Tex-Mex Seasoning, 1/2 Tsp. Dried Oregano, 1/2 Tsp. Garlic Powder, 1/2 Tsp. Onion Powder, 1/2 Tsp. Chipotle Powder, 1/2 Tsp. Mexican Chili Powder, 1/2 Tsp. Cumin, Himalayan Salt
  • 1 Cob Fresh Sweet Corn
  • 1 1/2 Tbsp. Red Onion, finely diced
  • 2 Green Onions, sliced
  • Small Handful Cilantro, chopped
  • 1 + Lime, zest & juice
  • Tajin Seasoning
  • EVOO
  • Himalayan Salt
  • GARNISH - Sliced Jalapeno, Vegan Cilantro Lime Sauce, Vegan Serrano Sauce, Fresh Cilantro
NOTES
  • If you're using street taco shells, you'll likely get 10 tacos. If you're using standard size small tortillas, you should aim for 6. This will also depend on the size of your russets. I neglected to measure how much cubed taters I was working with.
  • Any remaining salsa / beans can be stored in an airtight container for 4ish days.

DIRECTIONS

  • Preheat your oven to 400 F
  • Empty the refried beans in to a small, covered pot set to medium low. Cook until warmed through and leave covered on low until service.
  • Add the cubed potatoes to a mixing bowl and drizzle in 2 ish Tbsp. EVOO. Add all of the spices and toss to coat. Transfer the spiced taters to a parchment lined baking sheet and season liberally with salt. Bake for 25 - 30 minutes until slightly crisp but nice and fluffy inside.​
Picture
Picture
  • In the meantime, strip the corn from the cob and add it to a skillet set to just about medium heat. Stir as needed until corn is blistered / browned. Transfer to a mixing bowl and let cool slightly before adding in the cilantro, red onion, green onion, a few dashes of Tajin, the zest of one lime, a glug of EVOO, and the juice of one lime to start. Season with a pinch of salt and toss to combine. Taste and determine if a second lime is needed for juice. Set aside.
  • Heat a grill pan and warm up the tortillas on each side until malleable and warmed through.
  • For service, smear some refried beans on each tortilla followed by a good scoop of the taters. Spoon over some of the corn salsa followed by desired sauce, sliced jalapenos, and fresh cilantro. ENJOY!
Picture
Picture
Picture

HAPPY VEG

0 Comments

Jalapeno Cheetos Street Corn

4/14/2024

0 Comments

 
Picture

Jalapeno Cheetos Street Corn


Prep Time: 10 Min
Cook Time: 20 - 25 Min

Yields: 2 Cobs
Picture

WHAT YOU NEED

  • 2 Cobs of Fresh Sweet Corn
  • Mayonnaise
  • Bag of Jalapeno Cheddar Cheetos
  • 1 Jalapeno, thinly sliced
  • Finely Diced Red Onion
  • Grana Padano / Cotija
  • Fresh Cilantro
  • Sour Cream
  • Tajin Seasoning
NOTES
  • Don't leave the cheetos too chunky or they'll have a hard time sticking to the cobs. A few chunks is ok, but you want more of a bread crumb texture for the best coating.
  • This recipe is super easy to double, triple, etc. 
  • The corn is DELISH on the grill or even an air fryer. It's very adaptable!
  • I added my sour cream to a fine tipped squeeze bottle. This is just easier to garnish the cobs evenly with sour cream as opposed to dollops.

DIRECTIONS

  • Preheat your oven to 425 F.
  • Clean the cobs, leaving as much of the stalk attached as possible for a handle, spray them with cooking spray, and lay them on a baking sheet. Bake for 20ish minutes. Look for wrinkled kernels and some gorgeous light browning.​
Picture
Picture
  • In the meantime, add about 1 1/2 C of the cheetos to a ziplock that's almost sealed. This will allow air to escape. Grab a rolling pin and smash / roll the cheetos until crumbly like bread crumbs. Transfer them to a plate large enough to accommodate the cobs.
  • Once the cobs are ready, place the tray on a cooling rack for a couple minutes. Don't let the corn cool, just cool enough that you can handle without burning yourself. Drizzle / smear the cobs with mayo and use a basting brush to brush mayo all over every side of the cob. Drop the cobs on to the plate with the cheetos and roll them around, patting if needed to coat the cobs. 
  • Transfer the cobs to a serving dish / cutting board. Drizzle with the sour cream followed by a sprinkle of Tajin, finely shredded Cotija / Grana padano, fresh cilantro, diced red onions, and some thinly sliced jalapenos. ENJOY!
Picture
Picture
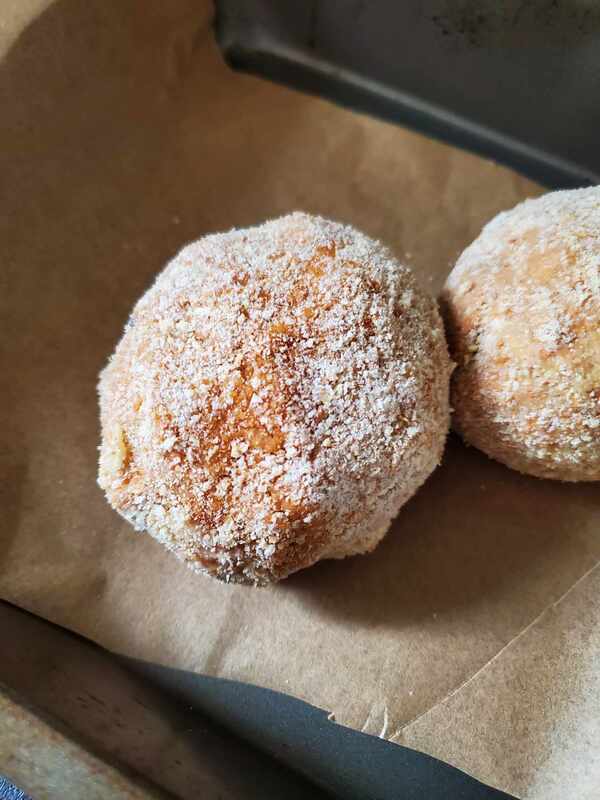
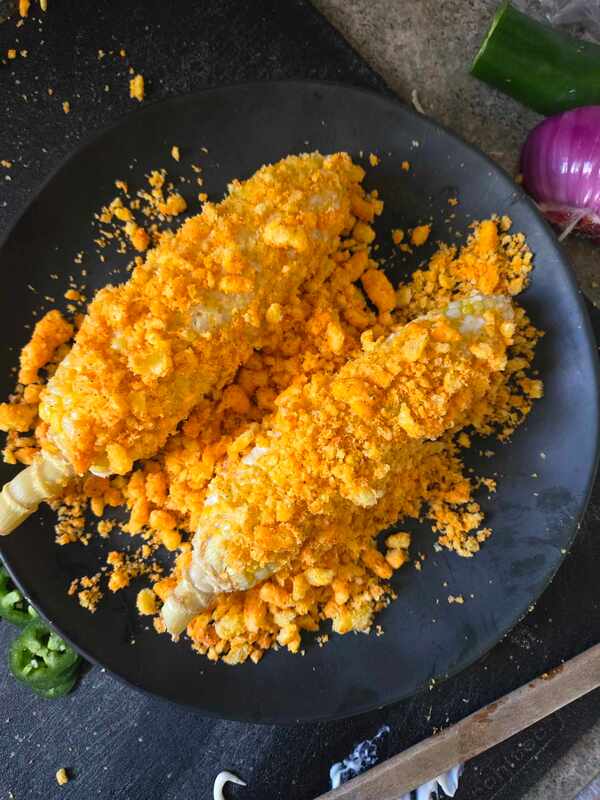
Now, what you'll probably notice is how unfortunately chunky some of my Cheetos were lol this is why in the recipe, I made sure to touch on that with the preparation. Look, I didn't care as I tore in to the cobs lol but they would have been better had I crushed up the cheetos a bit better!
Picture

HAPPY VEG

0 Comments

Savoury White Bean Skillet

4/12/2024

0 Comments

 
Picture

Savoury White Bean Skillet


Prep Time: 10 Min
Cook Time: 25 - 30 Min

Yields: 4 Side / 2 Main

Picture

WHAT YOU NEED

  • 2 Tbsp. EVOO
  • 2 Tbsp. Unslated Butter
  • 1/2 Tsp. Red Pepper Flakes
  • 3 cloves Garlic, crushed & minced
  • 1 Sprig Fresh Rosemary
  • Few Sprigs Fresh Thyme
  • 1 Yellow Onion, diced
  • 1 Carrot, peeled and cut in to half moons
  • 540ml Salt Free White Beans, drained
  • 1/2 Lemon +, juiced
  • 2 C PC Brand Plant-Based Chikn Broth
  • 1 x Hard Cheese Rind
  • 1/4 C Fresh Parsley, chopped & divided
  • Small Handful Fresh Basil, chopped
  • 1/3 C Pecorino, finely shredded
  • 1/2 Tsp. Broth Powder
  • Himalayan Salt & Cracked Pepper
  • Sourdough Bread + Garlic Cloves
  • GARNISH - Grana Padano, Parsley, Basil, Pepper Flakes, EVOO

DIRECTIONS

  • Begin heating the butter, EVOO, pep flakes, garlic, thyme, and rosemary, in a 10" skillet set to just about medium. Once heated, let everything sizzle together for up to a minute without burning. Add the onion, carrot, and a generous pinch of both salt & pepper. Stir and cook 6 - 7 minutes. Depending on the size of your lemon, you may need all of the juice but at this point, squeeze in the lemon juice and let it continue to simmer for another minute.​
Picture
Picture
​
  • Drain the beans and give them a quick rinse before adding them to the skillet. Stir, season with salt & pepper, and continue to cook until beans are warmed through. Pour in the broth and bring the skillet to a boil. Once boiled, reduce the heat to medium low / simmer and add the cheese rind, broth powder, and half the fresh parsley. Simmer 15 - 20 until veg are tender & broth is creamy and rich. Throughout the cook time, add additional broth if needed to keep the skillet saucy and simmering the entire time.
  • Turn off the heat and pluck out the rosemary & thyme sprigs, along with the cheese rind. Stir in the remaining parsley, pecorino, and basil until combined. Taste and adjust the salt / pepper if needed / desired.
  • Serve with sourdough bread for dipping. Oil and grill both sides of your slices until golden and crisp. Once completed, gently smash a garlic clove, peel it, and rub the clove all over the grilled bread. Serve each portion of the beans with a drizzle of EVOO, grated pecorino, pepper flakes, and fresh parsley. ENJOY!
Picture
Picture
Picture

HAPPY VEG

0 Comments
<<Previous

    Archives

    June 2025
    May 2025
    April 2025
    March 2025
    February 2025
    January 2025
    December 2024
    November 2024
    October 2024
    September 2024
    August 2024
    July 2024
    June 2024
    May 2024
    April 2024
    March 2024
    February 2024
    January 2024
    December 2023
    November 2023
    October 2023
    September 2023
    August 2023
    July 2023
    June 2023
    May 2023
    April 2023
    March 2023
    February 2023
    January 2023
    December 2022
    November 2022
    October 2022
    September 2022
    August 2022
    July 2022
    June 2022
    May 2022
    April 2022
    March 2022
    February 2022
    January 2022
    December 2021
    November 2021
    October 2021
    September 2021
    August 2021
    July 2021
    June 2021
    May 2021
    April 2021
    March 2021
    February 2021
    January 2021
    December 2020
    November 2020
    October 2020
    September 2020
    August 2020
    July 2020
    June 2020
    May 2020
    April 2020
    March 2020
    February 2020
    January 2020
    December 2019
    November 2019
    October 2019
    November 2018
    October 2018
    September 2018
    August 2018
    July 2018
    June 2018
    May 2018
    April 2018
    March 2018
    February 2018
    January 2018
    December 2017
    November 2017
    October 2017
    September 2017
    August 2017
    July 2017
    June 2017
    May 2017
    April 2017
    March 2017
    February 2017
    January 2017
    December 2016
    November 2016
    October 2016
    September 2016
    August 2016
    July 2016
    June 2016
    May 2016
    April 2016
    March 2016
    February 2016
    January 2016
    December 2015
    November 2015
    October 2015
    September 2015
    August 2015
    July 2015
    June 2015
    May 2015
    April 2015
    March 2015
    February 2015
    January 2015
    December 2014
    November 2014

    Jonathan - Happy Veg

    Recipes that everyone in the house will love, guaranteed.

    Categories

    All

Proudly powered by Weebly
Photos from Marcus Bichel Lindegaard, JeepersMedia, regan76, Kjokkenutstyr.net, Muffet, wuestenigel
  • The Happy Veggie
  • Recipes
  • Animal News
  • Bypass or Buy?
  • My Personal Blog
  • Kitchen, Veggies, and Health
  • Archives
  • VIDEOS