HAPPY VEG
  • The Happy Veggie
  • Recipes
  • Animal News
  • Bypass or Buy?
  • My Personal Blog
  • Kitchen, Veggies, and Health
  • Archives
  • VIDEOS

R E C I P E S

Roasted Cauli & Potato Burritos

9/30/2023

0 Comments

 
Picture
Roasted Cauli & Potato Burritos


Prep Time: 15 Min
Cook Time: 25 - 30 Min

Yields: 2 Burritos
Picture

WHAT YOU NEED

  • 2 x Burrito Tortillas
  • 250g Microwavable Mexican Rice
  • 398ml Refried Beans with Chilis
  • 540ml Salt-Free Black Beans, drained & rinsed
  • 1/2 Small Head Cauliflower, broken down in to small florets
  • 1 Russet Potato, peeled & cut in to cubes
  • Oil
  • S P I C E S - 1 Tsp. Mexican Chili Powder, 1 Tsp. Chipotle Powder, 1 Tsp. Garlic Powder, 1/2 Tsp. Onion Powder, 1/2 Tsp. Tex-Mex Seasoning, 1/2 Tsp. Cumin, 1/2 Tsp. Dried Oregano, 1/2 Tsp. + Himalayan Salt
  • 2/3 C Monterey Jack Cheese with Jalapenos, shredded
  • Red Cabbage, shredded
  • Hot Sauce
  • Prepared Salsa
  • Fresh Cilantro
NOTES:
  • You will likely have some leftover refried beans & black beans. Refrigerate them together or separately for up to 4 days. 
  • This recipe is easy to double if needed. Just double up on your cauli / potato mixture and the Mexican rice. You can stretch the beans out to 4 burritos if needed.

DIRECTIONS

  • Preheat oven to 425 F
  • Empty the contents of the refried beans in to a small, covered pot set to medium low. Heat until assembly.
  • Add your potatoes and cauliflower to a mixing bowl and toss them in your oil of choice. Just make sure your chosen oil has a high enough smoke point. Once coated, add all of the spices to the bowl and toss until evenly distributed. Transfer your spiced veggies to a parchment lined baking sheet.
  • Bake 15 minutes, flip, and continue for another 10 - 12 minutes until veggies are cooked and some browning has happened. Remove and set on to a wire rack while you gather your ingredients for assembly.​
Picture
Picture
  • A S S E M B L Y - First, heat your microwavable rice according to package directions. Next, lay out a burrito wrap and start by smearing a generous amount of the refried beans in the center of your wrap. Next, half the bag of rice followed by the potato / cauli mixture. Top with half the cheese, some of the black beans, prepared salsa of choice, several dashes of hot sauce, shredded red cabbage, and fresh cilantro. Fold one side of your burrito over the filling, tucking it in before folding in the sides and rolling up the burrito nice and tight. Complete the second burrito and we're ready to grill.
Picture
Picture
  • Preheat your grill pan to medium heat. Spray the burritos with cooking spray before slapping them on the grill and grilling each side for 2ish minutes until crispy, golden brown grill marks are present.
  • Serve sliced in half with a side of prepared salsa. ENJOY!

HAPPY VEG

Picture
0 Comments

Crispy Accordion Fingerlings

9/28/2023

0 Comments

 
Picture
Crispy Accordion Fingerlings


Prep Time: 15 Min
Cook Time: 35 - 40 Min
Picture

WHAT YOU NEED

  • 680g Fingerling Potatoes, halved lengthwise 
  • 4 Tbsp. EVOO
  • 1/2 Lemon
  • Dried Thyme
  • Red Pepper Flakes
  • Himalayan Salt & Cracked Pepper
  • G A R N I S H - Grana Padano, Fresh Parsley, chopped

DIRECTIONS

  • Preheat oven to 400 F
  • Cut vertical slices in your fingerlings on the exposed flesh side. Make sure not to cut through entirely. You're looking for an accordion affect but as stated, don't cut too deep or you'll cut right through them. Add them to a mixing bowl and dress them with the EVOO. Season liberally with Himalayan salt, cracked pepper, and dried thyme. Add pepper flakes to taste and transfer them to a parchment lined baking sheet flesh side down.​
Picture
Picture
  • Season the tray again with some Himalayan salt before putting them in to the oven to bake. Bake them for 35 - 40 minutes until tender and perfectly browned on the flesh side. No need to flip these throughout the cooking process, you get a crisp, flesh side and a fluffy underside. They're delicious!
  • Remove from oven and transfer the taters to a serving tray. Garnish with fresh parsley and grana padano. ENJOY!
Picture
Picture

HAPPY VEG

0 Comments

Creamy Jalapeno Ched Cauliflower Soup

9/26/2023

0 Comments

 
Picture
Creamy Jalapeno Ched Cauliflower Soup


Prep Time: 20 Min
Cook Time: 35 - 40 Min

Yields: 4 Bowls
Picture

WHAT YOU NEED

  • 3 Tbsp. Unsalted Butter
  • 1 Tbsp. EVOO
  • 2 cloves Garlic, crushed 
  • Pinch Red Pepper Flakes
  • 2 Jalapeno Peppers, seeded & diced
  • 1 Yellow Onion, diced
  • 1 Head Cauliflower, (6 C) Florets
  • 1 L Pres Choice Plant-Based Chikn broth (Sub Vegetable Broth)
  • 1/2 C Whipping Cream, room temp
  • 1/4 Tsp. + Himalayan Salt
  • 2 C Habanero Cheddar, shredded (Sub any cheddar variety)
  • Cracked Pep
  • G A R N I S H - Shredded Cheddar, sliced jalapenos, Green Onions

DIRECTIONS

  • Begin heating the butter, EVOO, garlic, and pepper flakes, in a medium sized pot set to just below medium heat. Once heated, let everything sizzle for a minute or so, stirring the garlic often to avoid burning. Add the onion, jalapenos, and a good pinch of salt & cracked pepper. Continue to cook another 6ish minutes, stirring as needed.
  • Next, add the cauliflower florets and another good pinch of both salt and pepper. Stir, cover, and cook 5 - 6 minutes. Remove cover and pour in your broth. Bring the soup to a boil and once boiled, add the 1/4 tsp. salt, reduce to medium low, cover, and simmer for 25 minutes.​
Picture
Picture
​
  • B L E N D - I have a Vitamix blender which blends hot liquids safely. Simply add the cream and blend until smooth and luscious. You can also use a good immersion blender, or simply blend in batches to avoid splattering. 
  • Return the soup and let it start bubbling. Turn off the heat and fold in your cheese. Taste your soup and add additional salt / pepper if desired.
  • For service, garnish your bowls with thinly sliced jals, additional shredded cheese, pepper flakes, and green onions. ENJOY!
Picture

HAPPY VEG

0 Comments

Naan Zas

9/22/2023

0 Comments

 
Picture
Naan Zas


​​Prep Time: 10 Min
Cook Time: 10 - 12 Min

Yields: 4 Zas
Picture

WHAT YOU NEED

  • 4 x Mini Garlic Naan Breads (180g)
  • Prepared Pesto
  • 1 C Pizza Mozzarella, shredded
  • 1/2 Yellow Onion, thinly sliced
  • Handful Grape Tomatoes, quartered
  • 1/2 Small Red Pepper, finely diced
  • Pepper Flakes
  • Dried Oregano
  • Sumac
  • G A R N I S H - Grana Padano, Fresh Basil

DIRECTIONS

  • Preheat oven to 400 F
  • Get your naan breads on to a parchment lined baking sheet and spray them with cooking spray. Spread some pesto on each naan followed by the mozzarella, divided between the 4 naans. Next, add some sliced onions, quartered grape tomatoes, and diced red peppers to each naan. Place some dried oregano in your palm and rub your hands together over each za, sprinkling them with oregano. Finish with a sprinkle of pepper flakes & sumac on each.​
Picture
Picture
Picture
Picture
  • Bake 10 - 12 minutes until cheese is bubbly and melted, and naans are nice and brown but not stiff or burnt. Remove and cool briefly before serving. Garnish your tray with finely shredded grana padano and some fresh basil leaves.
  • ENJOY!
Picture

HAPPY VEG

0 Comments

Sundried Tomato Pesto Bucatini

9/19/2023

0 Comments

 
Picture
 Sundried Tomato Pesto Bucatini 


Prep Time: 20 Min
Cook Time: 20 Min

Yields: 4 Servings 
Picture

WHAT YOU NEED

  • 400g Dry Bucatini Pasta
  • 3 Tbsp. EVOO
  • 1 Tbsp. Sundried Tomato Oil 
  • 1/4 Tsp. Red Pepper Flakes
  • 3 cloves Garlic, crushed & minced
  • 1/2 Yellow Onion, diced
  • 284g Grape Tomatoes
  • 2/3 C White Wine 
P E S T O 
  • 1/4 C Pine Nuts 
  • 1/4 Tsp. Red Pepper Flakes
  • 3 Tbsp. EVOO
  • 1 Tbsp. Sundried Tomato Oil
  • 1 Tbsp. Cold Water
  • 1 Lemon, juiced
  • 1 1/2 Tbsp. Sundried Tomatoes packed in oil, chopped
  • 2 cloves Garlic, smashed
  • 14 g Bushel Fresh basil (Approx 10 - 12 Tbsp. but the more the merrier)
  • 3 Tbsp. Fresh Parsley, roughly chopped
  • 1/3 C Grana Padano, shredded
  • 1/4 Tsp. Himalayan Salt
G A R N I S H
  • Fresh basil, Grana Padano

DIRECTIONS

  • Get a large pot filled with heavily salted, cold water, on the stove on medium high heat. Leave covered.
  • P E S T O - Add all ingredients to a small, personal blender, and blend until smooth. Alternately, you could do your pesto in the food processor. I prefer the emulsified pesto, as it blends in to a sauce with pasta water better IMO. Set aside.​
Picture
  • Begin heating the EVOO, sundried tomato oil, pepper flakes, and garlic, in a large skillet set to just below medium. Once heated, let everything sizzle together for about a minute before adding the onion and a good pinch of salt. Reduce heat slightly if needed to keep from scorching. Stir and cook for about 5 ish before adding the grape tomatoes and wine, increasing the heat back to about medium if you reduced earlier. Let the wine and tomatoes simmer together until reduced by half. At this point, drop your bucatini in to the boiling water and cook to just about al dente. Ladle pasta water in to the skillet with the wine & tomatoes to keep things simmering while the pasta cooks.
  • Once your bucatini is ready, transfer the cooked pasta directly to the skillet and begin tossing it together with the sauce / tomatoes. Continue to toss, releasing starches in to the skillet until the pasta is cooked to al dente perfection. Turn off the heat and add all of your pesto followed by a full ladle of pasta water. Toss until evenly coated and gorgeously glossy. Add more pasta water if needed so that you have a good amount of sauce on the bottom of the skillet. Taste and adjust salt if desired.
  • Serve each portion with a spoonful of your reserved pasta sauce from the bottom of the skillet. Garnish with grana padano & fresh basil / parsley. ENJOY!
Picture
Picture
Picture

HAPPY VEG

0 Comments

Egg Salad Lettuce Cups

9/17/2023

0 Comments

 
Picture
Egg Salad Lettuce
Cups


Prep Time: 10 Min
Cook Time: 10 - 15 Min
​Chill Time: 30 + Min

Yields: Varies 6 - 9 Cups
Picture

WHAT YOU NEED

  • 1 Head Romaine Lettuce
  • 5 Large, Free-Range Brown Eggs
  • 3 Tbsp. Red Onion, finely diced
  • 1 stalk Celery, finely diced
  • 1 Green Onion, thinly sliced
  • 1 Tbsp. Fresh Dill, chopped
  • 2 Tbsp. Fresh Parsley, finely chopped
  • 3 Tbsp. Mayonnaise
  • Splash EVOO
  • 1 Tsp. Dijon Mustard
  • 1/2 Tbsp. White Wine Vinegar
  • 1/4 Tsp. Himalayan Salt
  • Cracked Pep
  • GARNISH - Finely diced red onions, dill, thinly sliced green onions.

DIRECTIONS

  • Fill a medium sized pot with enough cold water to cover the eggs by about an inch. Carefully add the eggs and set the pot on to the burner at medium high heat. Once boiled, let the eggs go for 4 minutes. Remove from heat, cover, and let them sit for 5 - 7 minutes. Strain eggs to an ice bath and let them chill for a couple minutes before shelling them.
  • In the meantime, add you mayo, vinegar, & dijon, to a mixing bowl. Once the eggs are cool, peel off the shells, cut them in half, and scoop out the yolks from all but one full egg. Add the yolks to the mixing bowl and mash them together with the dressing until smooth and creamy. Chop up the eggs in to small pieces, similar in size to your celery / onion. Once the dressing has sat together for a few minutes, start piling in the rest of ingredients. Toss until thoroughly combined with the dressing evenly distributed.​
Picture
Picture
Picture
​
  • At this point, cover, and refrigerate for 30+ minutes to firm up and let the flavours come together.
  • For service, peel back the first few layers of larger leaves from your romaine until you get to the smaller, firmer, and lighter coloured ones. Peel off about 6 - 8 of those and give them a good wash & dry.
  • Disperse the egg salad between all of the lettuce cups. You want them nice and full, so you could end up with anywhere from 6 - 8 or 9, depending on the size of your leaves. Transfer them to a serving plate / dish and sprinkle them with cracked pepper, finely diced red onions, green onions, and fresh dill. ENJOY!
Picture

HAPPY VEG

0 Comments

Sundried Tomato & Sausage Zucchini Boats

9/15/2023

1 Comment

 
Picture
Sausage & Sundried Tomato Zucchini Boats


Prep Time: 20 Min
Cook Time: 45 Min

Yields: 6 Boats

Picture

WHAT YOU NEED

  • 3 Zucchinis, halved lengthwise, insides scooped out
  • 1/2 C Brown Rice, cooked
  • 1 C Pizza Mozzarella, shredded
  • 1 - 2 Red Thai Chilis, sliced
  • 1 Large, Free-Range Egg
  • 3 Tbsp. EVOO
  • Drizzle Sundried Tomato Oil From the Jar
  • 2 cloves Garlic, crushed & minced
  • 1 Tbsp. Fresh Basil, torn
  • 1 Yellow Onion,
  • 1 Bell Pepper, diced
  • 3 Tbsp. Sundried Tomatoes, chopped
  • 4 x Beyond Meat Hot Italian Sausages
  • 1/2 C White Wine
  • 1 Tbsp. Tomato Paste
  • 1/4 - 1/2 Tsp. Red Pepper Flakes (Depending on your heat tolerance)
  • 1 Tsp. Dried Oregano
  • 1 Tsp. Clubhouse Roasted Garlic & Red Pepper Seasoning
  • Himalayan Salt / Cracked Pepper
  • GARNISH - Grana Padano, Fresh Herbs 
NOTE
  • We are not including the zucchini flesh in the filling. You can keep it in air tight container in the fridge for a couple of days and utilize it in another recipe. It would be a welcome addition to a soup or sauté of sorts. 

DIRECTIONS

  • FILLING - Begin heating the EVOO, sundried tomato oil, garlic, oregano, pepper flakes, and roasted garlic seasoning in a large skillet set to just below medium. Once heated, let everything sizzle together for 30+ seconds without burning the garlic. Sprinkle in the basil, stir, and continue to cook another 30 seconds. Next, add the onion, bell pepper, and a good pinch of both salt & cracked pepper. Stir and cook 5ish minutes or until veggies are starting to look soft. Push the veggies to the outside o0f the skillet and crumble in your sausages. Break them up in to smaller crumbles as they brown up in the skillet. After about 3 minutes, you can go ahead and stir everything together. Next, stir in the tomato paste and wine, and let that simmer until reduced entirely. Fold in the cooked rice, taste, and season with salt & cracked pepper to your liking. Remove from heat and once cooled, fold in the egg.​

Picture
Picture
  • Preheat oven to 425 F
  • Place your halved zucchini boats on a parchment lined baking sheet. Divide the sausage filling between all 6 of the zucchini boats, pressing it in to fill the zucchinis entirely. Bake these for 15 minutes. Remove from the oven and top with your mozzarella, and sliced Thai chilis. Return the baking sheet to the oven for another 12 - 15 minutes until cheese is bubbly and melted, and zucchinis are fork tender. Remove and set on to a wire cooling rack.
  • Serve boats with grated grana padano and fresh herbs like parsley & basil. ENJOY!
Picture
Picture
Picture

HAPPY VEG

1 Comment

Sausage & Pepper Melt Ciabattas

9/12/2023

0 Comments

 
Picture
Sausage & Pepper Melt Ciabattas


Prep Time: 10 Min
Cook Time: 20 - 25 Min

Yields: 2 Ciabattas
Picture

WHAT YOU NEED

  • 2 x Ciabatta Buns
  • Prepared Pesto
  • 2 x Beyond Meat Hot Italian Sausages
  • 1 1/2 Tbsp. Unsalted Butter
  • Splash EVOO
  • 2 cloves Garlic, crushed & minced
  • 1 Yellow Onion, sliced
  • 1/2 Zucchini, sliced in to strips
  • 1/2 Red Bell pepper, sliced in to strips
  • 8 Slices Pizza Mozzarella (From the Ball)
  • 1/2 Tsp. Dried Oregano
  • 1 Tsp. Roasted Garlic & Red Pepper Seasoning
  • Himalayan Salt & Cracked Pepper
  • 2 Tbsp. Fresh Parsley, chopped

DIRECTIONS

  • Preheat oven to 400 F
  • Preheat a 10" skillet to about medium heat with the butter, splash of EVOO, garlic, oregano, pepper flakes, and roasted garlic seasoning. Once heated, stir and let everything sizzle together for about 30 seconds before adding the zucchini, onion, and bell pepper. Season with salt & cracked pepper, stir, and let those veggies cook until tender, stirring as needed. They should take about 6 - 10 minutes to be tender but not mushy. Taste and season with salt if desired. Stir in the fresh parsley and transfer the cooked veg to a covered bowl.​
Picture
Picture
​
  • Return the skillet to the heat and split your sausages in half lengthwise. Place them in the skillet and fry them up on both sides until sausages are fully cooked and nice and brown. Remove the sausages from the skillet and cut them in to 4 pieces each.
  • While the sausages cook, cut your ciabatta rolls in half and spread prepared pesto on both sides. Close them up and place them on a baking sheet. Bake for 5 - 6 minutes while your sausages are cooking.​
Picture
Picture
​
  • ASSEMBLY - Carefully remove the warmed ciabatta buns from the oven and transfer them to your cutting board. Open them up and start with your sliced sausages as the bottom layer. Next, 4 slices of pizza mozzarella to coat the sausages. Divide the sautéed veg between both ciabattas, close them up, and return them to the baking sheet.
  • Return them to the oven for another couple of minutes until the cheese is melted and buns are nice and toasty. Once melted, remove from the oven and carefully transfer the sammies to your cutting board. Cut them in half and serve them up. ENJOY!
Picture
Picture
Picture

HAPPY VEG

0 Comments

Spicy Chilaquiles

9/10/2023

0 Comments

 
Picture
Spicy Chilaquiles


​Prep Time: 15 Min
Cook Time: 15 - 20 Min

Yields: 2 Servings
Picture

WHAT YOU NEED

  • 2 x Burrito Tortillas + Frying Oil of choice, Himalayan Salt, Tajin
  • 2 Large, Free-Range Eggs + Himalayan Salt, Cracked Pep, Red Pepper Flakes, Tajin, Cooking Spray
  • 215ml Red Enchilada Sauce
  • 10 + Dashes Spicy Valentina Hot Sauce (Sub Hot Mexican Sauce of Choice)
  • Lime
  • 1/2 C Monterey Jack Cheese, shredded
  • Garnishes - Crumbled Feta Cheese, Diced Red Onions, Fresh Cilantro, Sliced Green Onions, Valentina Hot Sauce

DIRECTIONS

  • CHIPS - Fill a medium sized pot about half way up with your desired frying oil and set it to medium heat. Cut the burrito wraps in to long strips, then, cut those strips in to triangle shaped chips. Continue to test the oil by breaking apart one chip and dropping little pieces of it in. You're looking for immediate, rapid bubbling and floating to the top. Once heated, fry your tortilla chips in batches, letting them go until golden brown, flipping as best you can, and finishing on a paper towel lined plate with a sprinkling of salt & Tajin. Continue until all chips are finished cooking and seasoned on your plate. Set aside and don't forget to take that oil off of the heat.​
Picture
  • On that same burner, get a small, 10" cast iron heating up on medium. Pour in the enchilada sauce, fill the jar 1/2 way with water, swish it around, and pour this in to the skillet as well. Squeeze in the juice of half a lime to start, and 10+ dashes of the spicy Valentina, and season with salt. Stir and let the sauce start bubbling. Once bubbling away, reduce slightly and let it simmer for 5ish. Give it a taste and if desired, add additional lime or hot sauce. Once ready, drop in your chips and stir to coat them completely. They will simmer in the sauce only for the duration of time it takes to cook your eggs.
  • Heat a small, stainless pan sprayed with cooking spray to just below medium. Crack in the eggs once heated, and season with salt, cracked pepper, red pepper flakes, and Tajin. Once the white looks almost done, take a little water in the lid for the pan and flip it over to cover the pan. Turn off the heat and after about 30 + seconds, the whites should be set while the yolks should still be gorgeous and golden.
Picture
Picture
​
  • Transfer the skillet of saucy chips to a cooling rack / serving station. Carefully top with your eggs with some crumbled feta or Cotija cheese, fresh green onions and cilantro, and some crisp, red onions. Serve on its own, or with a side of chips / tortillas. ENJOY!
Picture

HAPPY VEG

0 Comments

Grilled Zucchini Lasagna

9/8/2023

0 Comments

 
Picture
Grilled Zucchini Lasagna


Prep Time: 25 Min
Cook Time: 1 Hour 20 Mins +

Yields: 6 Pieces

WHAT YOU NEED

SAUCE
  • 1/4 C EVOO
  • 1/2 Tsp. Red Pepper Flakes
  • 3 cloves Garlic, crushed
  • Handful Fresh Basil, torn
  • 1 Yellow Onion, diced
  • 1 Large Carrot, peeled & diced
  • 2 stalks Celery, diced
  • 1 Tbsp. Tomato Paste
  • 2/3 C White Wine
  • 796 ml San Marzano Tomatoes
  • 1/2 Tsp. + Himalayan Salt
FILLING
  • 2 x 280g Full Fat Ricotta
  • 1 clove Garlic, crushed & minced
  • 1 Tbsp. Fresh basil, chopped
  • 2 Tbsp. Fresh Parsley, chopped
  • 1/2 C Grana Padano, shredded
  • 1 Large, Free-Range Egg
  • 1/2 Tsp. Himalayan Salt
  • Cracked Pepper
  • Dash Ground Nutmeg
OTHER
  • 3 Large Green Zucchinis
  • 1 C Pizza Mozzarella, shredded
  • GARNISH - Fresh Basil, Fresh Parsley,. Grana Padano
Picture

DIRECTIONS

  • SAUCE - Begin heating the EVOO, pepper flakes, and garlic, in a medium sized pot set to just below medium heat. Once heated, let everything sizzle together for 30 seconds before stirring in the fresh basil and continuing to cook for another 30ish seconds. Add the onion, carrot, celery, and a generous pinch of salt. Stir and cook 5 - 6 minutes before stirring in the tomato paste and continuing to cook another minute or so. Pour in the wine and stir to loosen up any bits from the bottom of the pot. Let the wine simmer until reduced by half. Pour in the tomatoes, rinse out the can with water and pour that in to your sauce as well. Break up the tomatoes a bit as you wait for the sauce to come to a boil. Once boiled, add the salt, reduce the heat to medium low, cover, and simmer 25 minutes. Use an immersion blender to puree until smooth. Taste and season with additional salt if desired.
  • FILLING - Mix everything together minus the egg. Taste your filling and season to taste before stirring in the egg until thoroughly combined. Cover and refrigerate until assembly.
  • Preheat a grill pan to just below medium and spray it with cooking spray. Cut the tops off of the zucchinis. Using the thinnest setting on your mandolin, slice each of the zucchinis in to long, thin strips. Grill the zucchini strips on each side until gorgeous grill marks are evident. Transfer cooked zuccs to a plate, and continue until all of the zucchini slices have been grilled.
Picture
Picture
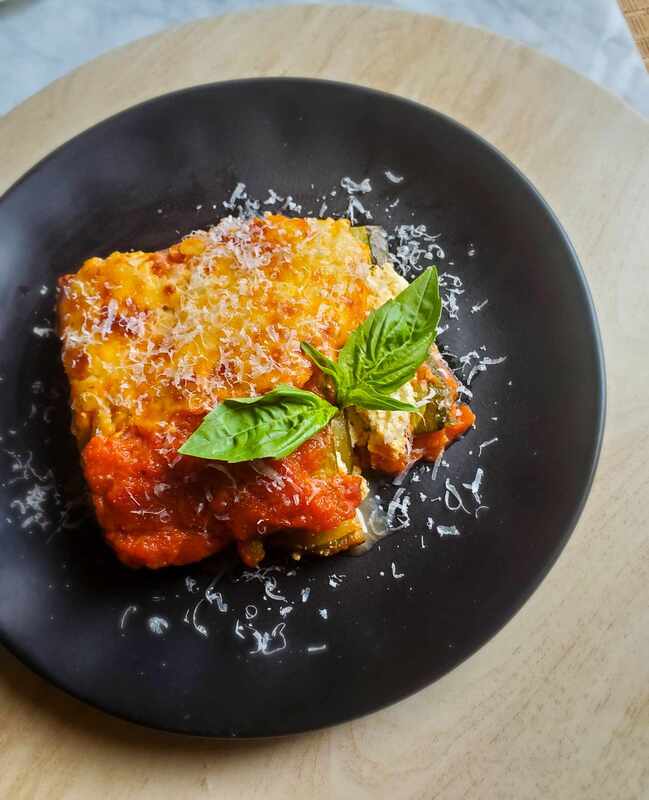
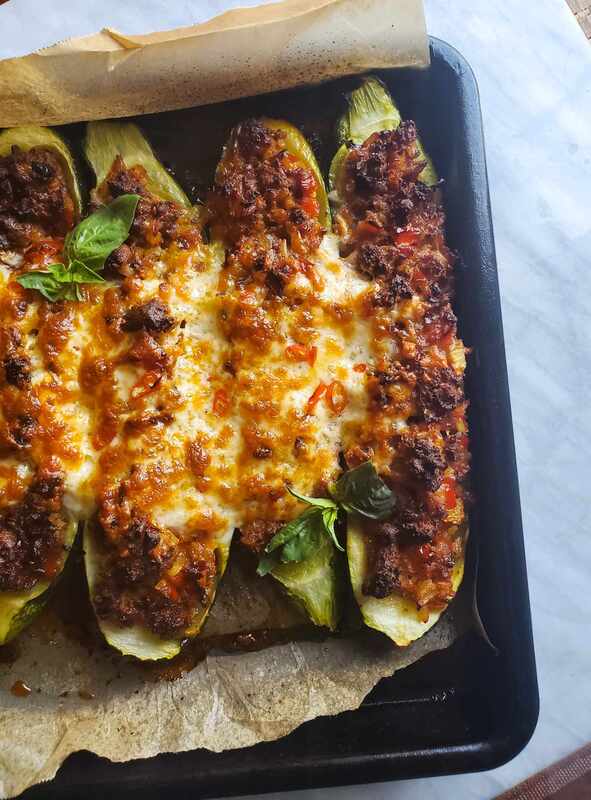
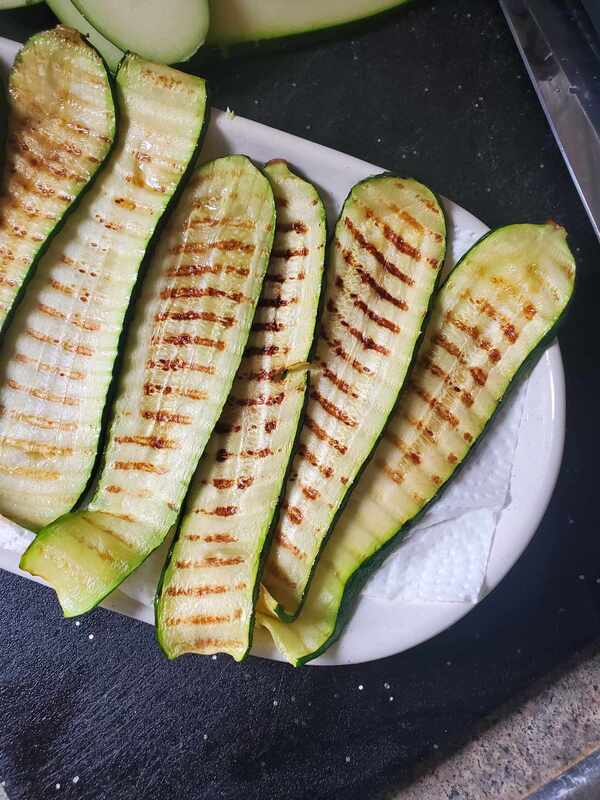
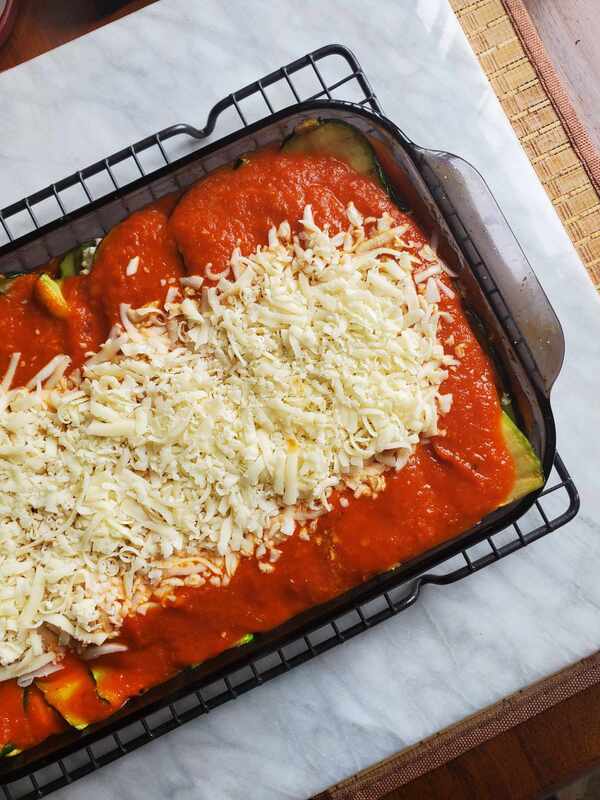
N O T E - When I made this recipe, I went ahead and grilled the zuccs, assembling a short time later. Admittedly, the bottom of my baking dish was a bit watery when the lasagna came out. This did not bother me, nor did it affect the flavour of the recipe. To avoid the excess liquid, salt your zucchini slices and lay them on a rack, allowing them to drain excess liquids. Begin this process prior to starting your sauce. Rinse the zuccs and pat them dry prior to grilling.
Picture
  • ASSEMBLY - Preheat oven to 375 F. Ladle some of your sauce in to the bottom of a 7" x 11" baking dish. Lay grilled zucchini slices to coat the bottom of the dish. Some overlapping is perfectly fine. Next, spread half of your ricotta filling over the first layer of zuccs. Don't worry if the zucchinis are moving all over when spreading, just do your best to keep them in place. Lay out more slices of zucc on top of the ricotta filling to form the second layer. Spread the other half of filling and top with a final layer of grilled zuccs. Smother in tomato sauce and top with your mozzarella cheese. Additional sauce can be saved for service with any leftover sauce being refrigerated in an air tight container for 4 - 5 days.
  • Cover and bake 35 minutes. Remove cover and continue to bake another 15 - 20 until cheese is bubbly, melty, and golden. Remove and set the lasagna on to a wire cooling rack for 15 - 20 minutes.
  • Slice in to 6 pieces and serve each piece with some grated grana and fresh herbs. ENJOY!
Picture

HAPPY VEG

0 Comments
<<Previous

    Archives

    February 2026
    January 2026
    December 2025
    November 2025
    October 2025
    September 2025
    August 2025
    July 2025
    June 2025
    May 2025
    April 2025
    March 2025
    February 2025
    January 2025
    December 2024
    November 2024
    October 2024
    September 2024
    August 2024
    July 2024
    June 2024
    May 2024
    April 2024
    March 2024
    February 2024
    January 2024
    December 2023
    November 2023
    October 2023
    September 2023
    August 2023
    July 2023
    June 2023
    May 2023
    April 2023
    March 2023
    February 2023
    January 2023
    December 2022
    November 2022
    October 2022
    September 2022
    August 2022
    July 2022
    June 2022
    May 2022
    April 2022
    March 2022
    February 2022
    January 2022
    December 2021
    November 2021
    October 2021
    September 2021
    August 2021
    July 2021
    June 2021
    May 2021
    April 2021
    March 2021
    February 2021
    January 2021
    December 2020
    November 2020
    October 2020
    September 2020
    August 2020
    July 2020
    June 2020
    May 2020
    April 2020
    March 2020
    February 2020
    January 2020
    December 2019
    November 2019
    October 2019
    November 2018
    October 2018
    September 2018
    August 2018
    July 2018
    June 2018
    May 2018
    April 2018
    March 2018
    February 2018
    January 2018
    December 2017
    November 2017
    October 2017
    September 2017
    August 2017
    July 2017
    June 2017
    May 2017
    April 2017
    March 2017
    February 2017
    January 2017
    December 2016
    November 2016
    October 2016
    September 2016
    August 2016
    July 2016
    June 2016
    May 2016
    April 2016
    March 2016
    February 2016
    January 2016
    December 2015
    November 2015
    October 2015
    September 2015
    August 2015
    July 2015
    June 2015
    May 2015
    April 2015
    March 2015
    February 2015
    January 2015
    December 2014
    November 2014

    Jonathan - Happy Veg

    Recipes that everyone in the house will love, guaranteed.

    Categories

    All

Proudly powered by Weebly
Photos from Marcus Bichel Lindegaard, JeepersMedia, regan76, Kjokkenutstyr.net, Muffet, wuestenigel
  • The Happy Veggie
  • Recipes
  • Animal News
  • Bypass or Buy?
  • My Personal Blog
  • Kitchen, Veggies, and Health
  • Archives
  • VIDEOS