HAPPY VEG
  • The Happy Veggie
  • Recipes
  • Animal News
  • Bypass or Buy?
  • My Personal Blog
  • Kitchen, Veggies, and Health
  • Archives
  • VIDEOS

R E C I P E S

Corn and Black Bean Stuffed Cubanelles

11/28/2015

0 Comments

 
One night while I was enjoying some beers (Coors are my favourite) I came up with this recipe. Originally, I was going to stuff fresh Jalapeno Peppers but I was inspired to use the Cubanelle peppers after my visit with the fruit market. They literally jumped off the shelf into my arms!

This dish turned out amazing! It`s equal parts stuffed peppers / casserole because I made so much creamy, cheesy sauce and realized I didn't have enough peppers so I decided to use it to top the peppers as well!

You guys are going to love this one!

cheesycornstuffedcubanelles.docx
File Size: 36 kb
File Type: docx
Download File

Picture
Black Bean and Corn Stuffed Cubanelles


Prep Time: 25 Min

Cook Time: 45 Min


  1. Preheat oven to 400 F

  1. Slice the tops off the peppers and set the tops aside, seed them and line them on a baking sheet coated with foil. Drizzle EVOO generously over the peppers and season with sea salt. Bake 10 – 15 Min. Remove and cool.
 

  1. Set oven to 350 F
**Maximize time by beginning the next steps while the peppers are roasting.

  1. In a large saucepan, fill ¾ with cold water and bring to a boil on medium high heat. Season with salt, drop the corn in and boil 5 minutes and strain.

  1. In the same saucepan, melt the 1 Tbsp. butter on medium heat. Slice the pepper away from the stem on the pepper tops and roughly chop. Add the pepper and onion to the pan with a sprinkle of sea salt and cook 5 minutes stirring often. Add the garlic and continue cooking another 3 minutes.

  1. Add the flour stirring it into the frying veg. Add the 2 Tbsp. butter and continue stirring and frying 3 minutes.


                   Grocery List
  • 8 Cubanelle Peppers, seeded and tops removed / reserved
 
  • 1 Tbsp. Unsalted Butter
  • 4 heads fresh Corn, stalk and husks removed (21/2 – 3 Cups)
  • ½ Yellow Onion, diced
  • 8 Cubanelle tops, chopped
  • 1 clove Garlic, chopped
  • 2 Green Onions, sliced
 
  • 2 Tbsp. + AP Flour
  • 2 Tbsp. Unsalted Butter
  • 1 C 2% Milk
  • 2 Tbsp. Heavy Cream
  • 1 ¾ C Monterey Jack Cheese, shredded
  • 1/8 Tsp. White Pepper
  • Sea Salt
 
  • 1 C canned Black Beans, rinsed
  • 2 Tbsp. Salsa Verde
 
  • TOP WITH ¼ C Monterey Jack Cheese, shredded
  • Handful Salty Tortilla Chips, smashed

  1. Slowly stir in the milk and cream. Allow the mixture to bubble before stirring the Monterey jack cheese in in small batches. Reduce the heat to medium low. Simmer 5 minutes and stir in the fresh corn, black beans, green onions, white pepper, and a pinch of sea salt.

  1. Use a tablespoon to pack the cheesy corn and bean mixture into the peppers until filled. Line a 1 ½ qt. Baking Dish with the Salsa Verde. Place the stuffed peppers in the dish with the open side facing the edge of the dish. Ladle the remaining 2 scoops of cheesy corn mixture over the peppers and top with the shredded Monterey Jack cheese.

  1. Bake uncovered 15 – 20 Minutes.

  1. Remove from oven and sprinkle smashed tortilla chips over the dish.

  1. Serve.
0 Comments

Salsa Verde

11/26/2015

0 Comments

 
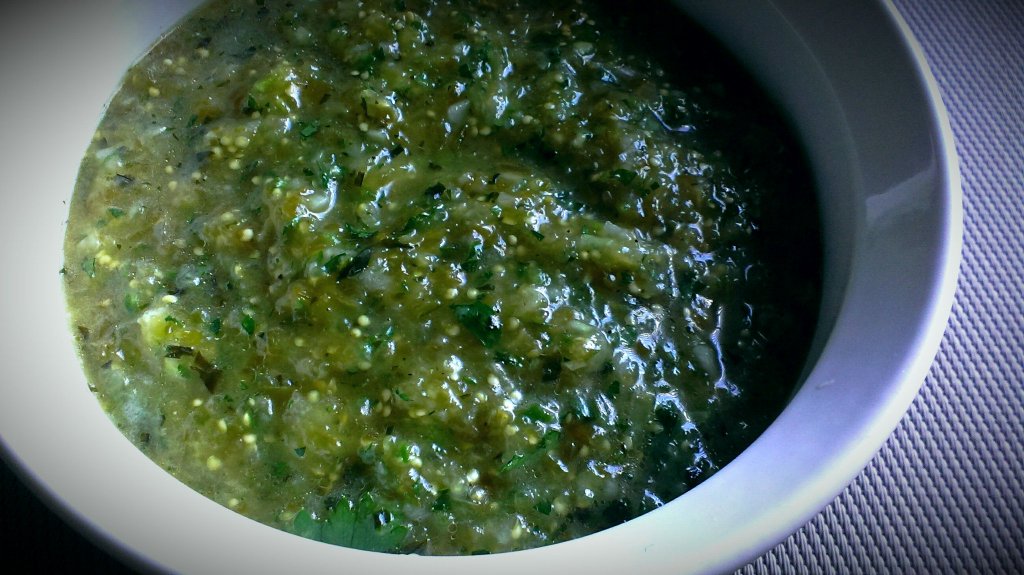
Salsa Verde comes in many varieties depending on the recipe you look at. In lieu of this, I've created a more traditional variety incorporating Tomatillos which I recently located at my fruit market. I am so excited to have the opportunity to work with these beautiful green gems.
Picture
Picture
salsaverde.docx
File Size: 167 kb
File Type: docx
Download File

Picture

Salsa Verde


Prep Time: 5 Min

 
  1. Combine all ingredients in food processor. Season with sea salt / black pepper to taste. Pulse a few times before finishing on puree until thoroughly blended.
                        Grocery List
  • 400ml can Tomatillo, drained
  • 1 Tbsp. fresh Cilantro
  • 1 Tbsp. fresh Parsley
  • 1 Jalapeno, seeded
  • ½ Yellow Onion, roughly chopped
  • 2 Tbsp. Jalapeno Hot Sauce
  • 2 Tbsp. EVOO
  • Sea Salt / Black Pepper
Picture
0 Comments

Zucchini and Corn Cups

11/23/2015

0 Comments

 
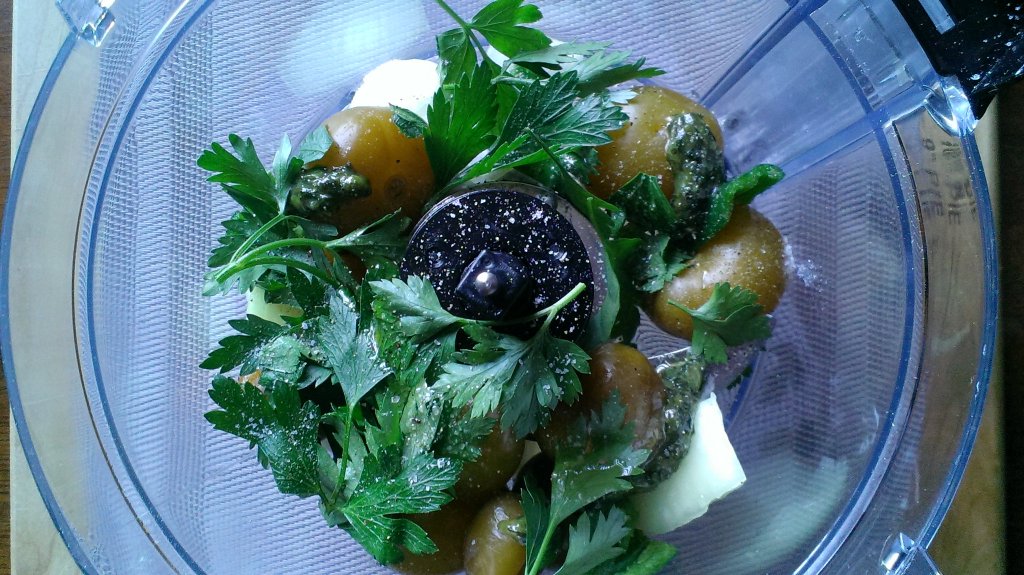
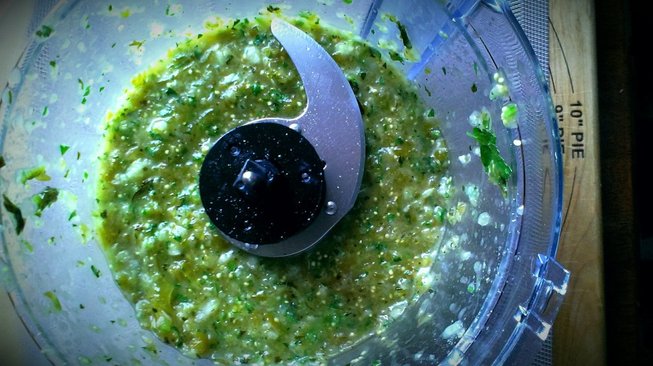
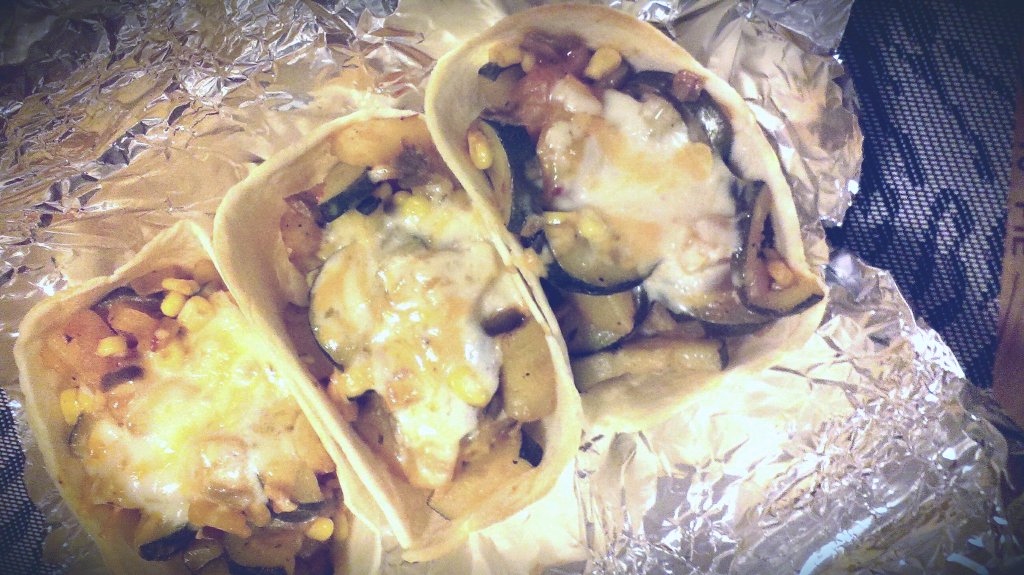
I take the opportunity to try new restaurants when I go out, I just love the overall experience of dining out. From the ambiance and service to the menu and plate delivery, I love it all. A few weeks back, one of my very best friends alerted me to a Mexican restaurant that had opened up in her neighbourhood.

Supporting local is wonderful but neither of us need an excuse to enjoy a good, Mexican meal. It was a cute place and cute, menu but one dish stood out. It was a zucchini and corn saute but it was so much more than that. Spiced beautifully and pops of juicy flavour in every bite from the corn, this dish was a home run! I needed to recreate it at home!

My version was a bit different but equally as delicious and the Old El Paso Taco bowls are the perfect vessels for the zucchini saute.

Eat it and love it the way I did!

zucchinicornchilicups.docx
File Size: 136 kb
File Type: docx
Download File

Picture

Zucchini and Corn Cups


Prep Time: 15 Min

Cook Time: 45 Min
 
  1. Bring a medium sized sauce pot filled with cold water to a boil on medium high heat. Add a generous pinch of sea salt and the cubed potato. Boil partly covered for 5 minutes, strain and set the potatoes aside.
 
  1. In a large frying pan, bring to temperature on medium and melt the butter and EVOO together. Add the red and green onion, yellow bell pepper, jalapeno pepper, and a good pinch of sea salt. Cook 5 minutes stirring often.
 
  1. Stir in diced potato, garlic, and red pepper flake and continue frying another 3 or 4 minutes. Stir in the zucchini and another pinch of sea salt and continue frying another 3 minutes.
 
  1. Add the vegetable stock, hot sauce, cilantro, paprika, garlic powder, ¼ Tsp. Black Pepper, and a pinch of sea salt. Cook covered over medium heat 10 - 13 minutes stirring often.
 
  1. Preheat oven to 375 F
 
  1. Line a baking sheet with tinfoil and line tortilla cups on the sheet. Bake 3 – 4 minutes and remove.
 
  1. Scoop the zucchini mixture into the 6 cups and split the shredded cheese evenly between them for the tops. Bake another 5 – 7 Minutes until edges of tortilla bowls are starting to brown and cheese is melty.


                   Grocery List

  • 6 Old El Paso Tortilla Bowls
 
  • 2 Tbsp. EVOO
  • 2 Tbsp. Unsalted Butter
  • 2 Zucchinis, halved lengthwise and sliced (3 cups approximately)
  • ½ Red Onion, diced
  • ½ Yellow Bell Pepper, chopped
  • 2 Green Onions, sliced
  • 2 cloves Garlic, chopped
  • 1 Russet Potato, cubed
  • 1 Jalapeno, seeded and diced
  • ½ C frozen Sweet Corn
 
  • ¼ C low sodium Vegetable Stock
  • 1 ½ Tbsp. Cilantro, chopped
  • ½ Tsp. Red Pepper Flakes
  • ½ Tbsp. Smoked Paprika
  • ½ Tsp. Garlic Powder
  • 1 ½ Tbsp. Mexican Hot Sauce
  • Sea Salt / Black Pepper
 
  • ½ C Monterey Jack Cheese, shredded
¼ C Marble Cheddar, shredded
Picture
0 Comments

Buttermilk Ranch Dressing

11/21/2015

0 Comments

 
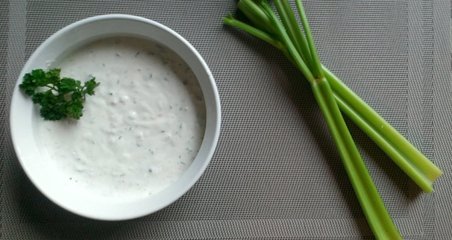
Ranch is probably the first salad dressing you love as a child. It is so delicious it really made eating veggies as a child tolerable. Making Ranch dressing is actually quite easy and tastes wonderful! You can add so many different herbs and spices to contribute to the flavour, it really is so simple.

Picture

Buttermilk Ranch Dressing


Prep Time: 5 Min
Chill Time: 30 Min +

  1. Combine all ingredients in mixing bowl. Grate in the garlic and carrot on the smallest grate size available. Season with salt and pepper to taste. Whisk to combine and seal in refrigerator for 30 minutes or longer.
                        Grocery List
  • 1/3 C Buttermilk
  • 2 Tbsp. Low Fat Sour Cream
  • 2 Tbsp. Mayonnaise
  • 1 Tbsp. fresh Basil, finely chopped
  • 2 Tbsp. curly Parsley, finely chopped
  • 1 Tbsp. Yellow Onion, diced small
  • 1 large clove Garlic, grated / pressed
  • 5 Baby Carrots, grated
  • 1 Tsp. Hot Sauce
  • Pinch Red Pepper Flakes
  • Sea Salt / Black Pepper
Picture
0 Comments

Pesto Cheese Ball

11/19/2015

0 Comments

 
Picture
Pesto Cheese Ball


Prep Time:10 Min

Chill Time: 1 Hr +

 
  1. Combine pine nuts, parmesan, basil, parsley, and garlic in food processor, Puree everything together quickly and shut the processor off.
 
  1. Add the lemon juice and a good pinch of sea salt and black pepper. Pulse a few times before hitting puree again and slowly pouring in the EVOO until the pesto is the consistency you desire. Transfer to a small bowl.
 
  1. In a small mixing bowl, combine the cream cheese, mozzarella, parmesan, pinch sea salt, and mayonnaise. Use an electric mixer to beat the ingredients together starting on a low setting and working up quickly.
 
  1. Stir about 2 Tbsp. of the Pesto into the cheese mixture. (Reserve the remainder for a future dish or add a little more for a stronger flavour) Once combined, scoop cheese mixture out onto cutting board and gently pat into a ball. Wet your hands and finish by gently rolling into a ball shape.
 
  1. Line a small plate with the parmesan, fresh parsley, and black pepper. Roll cheese ball in the parmesan and herb mixture and transfer to a plate lined with parchment paper. Form a piece of plastic wrap around the ball and refrigerate at least an hour to firm up. The longer it chills the better!
 
  1. Serve with your favourite crackers.


                      Grocery List
  • ¼ C Pine Nuts
  • 2 Tbsp. Parmesan, grated
  • 1 C fresh Basil
  • ½ C fresh Parsley
  • 2 cloves Garlic
  • 1 Tsp. Lemon Juice
  • Sea Salt / Black Pepper
  • ¼ C EVOO +
 

  • 227g tub Cream Cheese
  • 227g tub Light Cream Cheese
  • ¾ C Mozzarella, shredded
  • 1 Tbsp. Parmesan, grated
  • 1 Tbsp. Mayonnaise
  • Pinch Sea Salt

  • ¼ C Parmesan, grated
  • 1/3 C fresh Parsley, finely chopped
  • ½ Tsp. Black Pepper
Picture
0 Comments

Jambalaya

11/16/2015

0 Comments

 
Picture
jambalaya.docx
File Size: 191 kb
File Type: docx
Download File

Picture
Jambalaya


Prep Time: 10 Min

Cook Time: 45 Min
  1. In a medium sized sauce pot, bring to temperature and add half the oil. Add the sliced sausages and 1 Tsp. seasoning. Fry over medium heat stirring often for 3 – 4 minutes until browned. Transfer fried sausages to a separate bowl.
 
  1. To the same pot, add the remainder of the oil. Add the onion, green onion, pepper, jalapeno, celery, and garlic. Give a generous pinch of sea salt and black pepper and fry over medium heat 5 – 7 minutes.
 
  1. Stir in the diced tomatoes, worcestershire sauce, sliced sausages, and hot sauce. Simmer 10 minutes on medium low.
 
  1. Return to medium and add the rice, vegetable stock, and 2 Tbsp (minimum) Cajun seasoning. Bring to a boil, reduce heat to medium low, cover and simmer 20 minutes stirring occasionally.
 
  1. Taste and adjust salt / Cajun seasoning to taste. Garnish with sliced green onion.
 

                    Grocery List
  • ¼ C EVOO
  • 3 Veggie Sausages (Yves), sliced
  • 1 Tsp. Cajun Seasoning
 
 
  • 1 Bell Pepper, chopped
  • 1 Red Onion, diced
  • 2 stalks Celery, sliced
  • 1 Green Onion, sliced
  • 1 Jalapeno, seeded and diced
  • 2 cloves Garlic, chopped
  • 1 C canned, diced Tomatoes (including juice)
  • 1 Tsp. Worcestershire Sauce
  • 1 Tsp. Hot Sauce
  • 2 Tbsp. + Cajun seasoning
  • ¾ C long grain White Rice
  • 1 ½ C low sodium Vegetable Stock
  • Sea Salt / Black Pepper
 
 
          CAJUN SEASONING
  • 1 Tsp. Sea Salt
  • 1 Tsp. Cayenne Pepper
  • 1 Tsp. fresh Thyme
  • 1 Tsp. dried Oregano
  • ½ Tsp. minced Onion
  • ½ Tsp. Garlic Powder
  • ½ Tsp. Black Pepper
0 Comments

Broccoli & White Cheddar Arancini

11/13/2015

0 Comments

 
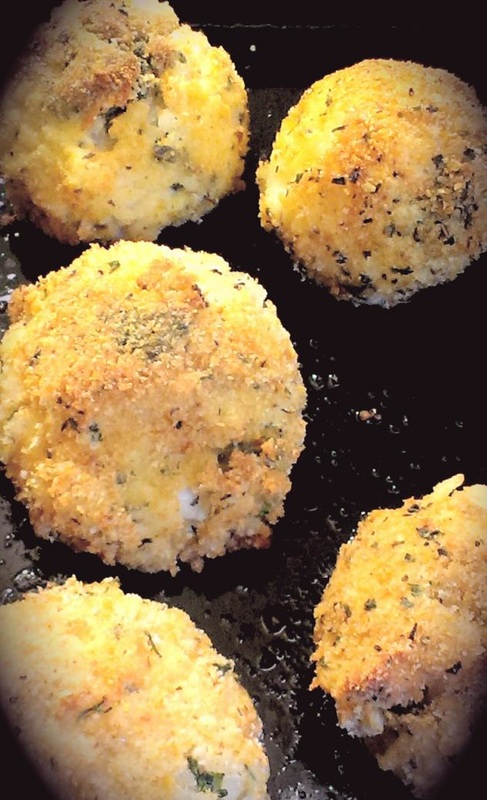
The first time I tried Arancini I fell in love. Rice and seasonings wrapped around cheese, rolled in crumbs, and fried. In other words, a picture perfect snack. I made a very traditional version the first time I made them and they were so delicious!

It also got me thinking, what other ingredients and combinations can we stuff in there?
My version pairs lightly sauteed Broccoli and sharp, old White Cheddar, rolled up in a lightly seasoned basil arborio rice. They were amazing!

I also decided to bake as opposed to fry. You can obviously fry them as well and achieve the same results.
ENJOY

Picture
Broccoli & White Cheddar Arancini


Prep Time: 15 Min
Cool Time: 1 Hr 15 Min +
Cook Time: 45 Min


  1. Add to a medium sauce pan the rice, water, vegetable stock, butter, and salt. Bring to a boil on medium to medium high heat. Reduce heat to medium low and simmer about 20 minutes covered. Stir in the fresh basil and parmesan. Transfer the rice to a parchment lined baking sheet and press evenly across sheet to cool. Refrigerate 45 mins.
 
  1. Bring a small frying pan to temperature on medium and add the oil and vegetable stock to the pan. Add the broccoli and a pinch of sea salt / black pepper. Cook 5 – 7 min covered, stirring often. Transfer to a paper towel lined plate and set aside.
 
  1. Prepare the “breading station”. Have a plate out with flour, bowl out with the beaten eggs, and combine the two different crumbs, dried herbs, and salt on another plate.
 
  1. Using an ice cream scoop, press a tbsp. of rice into the bottom of the scoop. Press the rice away from the middle against the sides forming a rice bowl. Scoop a little of the broccoli into the center of the rice bowl along with a cube of the white cheddar. Take another scoop of the rice (about a tbsp.) and press it down over the cheese /broccoli. Transfer from the scoop to your palm and gently roll it out. Continue until 10 -12 balls are formed.
 
  1. Roll the balls through the flour, followed by the egg and lastly, the crumbs. Transfer the coated balls to a parchment lined baking sheet and return to the fridge for 30 + minutes to firm.
 
  1. Preheat oven to 400 F
 
  1. Remove the parchment paper / balls from the baking sheet. Spray the sheet with EVOO spray (any baking spray) and line the rice balls on the baking sheet evenly spread apart. Spray each of the rice balls with the spray and place the balls in the oven to bake.
 
  1. Bake approximately 20 minutes until brown and crispy and the cheese is starting to burst out.
 
  1. In a small microwaveable bowl, combine the 2 Tbsp. butter, garlic, basil, parmesan, and sea salt. Melt in the microwave about 1 minute stirring halfway. Drizzle the buttery mixture over each of the crispy rice balls.
 
  1. Serve with a side marinara for dipping or enjoy them on their own.


                          Grocery List
  • 1 C Arborio Rice
  • 1 C Water
  • 1 C low sodium Vegetable Stock
  • 2 Tsp. Unsalted Butter
  • 1 Tsp. Sea Salt
  • 2 Tbsp. Fresh Basil, roughly chopped
  • 1 Tsp. Parmesan, grated
 
  • 1 C Broccoli Florets, chopped
  • 1 Tbsp. EVOO
  • 2 Tbsp. low sodium Vegetable Stock
  • Sea Salt / Black Pepper
 
  • 10 – 12 cubes Old White Cheddar
 
  • 2 Eggs, beaten
  • 1 C AP Flour
  • ½ C Bread Crumbs
  • ½ C Corn Flake Crumbs
  • ½ Tsp dried Parsley
  • ½ Tsp. dried Basil
  • ¼ Tsp. dried Oregano
  • ¼ Tsp. Sea Salt
 
  • 2 Tbsp. Unsalted Butter
  • 1 clove Garlic, pressed / minced
  • 1 Tsp. fresh Basil, chopped
  • 1 Tbsp. Parmesan, grated
  • Pinch Sea Salt
Picture
0 Comments

Cranberry Citrus Muffins

11/11/2015

0 Comments

 
I love cranberries.
I love their colour. I love the way they pop. I love how tart and sour they are. I could go on and on and that's without even mentioning the obvious health benefits.

Muffins are super easy.

COMBINE + MIX + BAKE = MUFFINS


Picture
crancitrusmuffins.docx
File Size: 151 kb
File Type: docx
Download File

Picture
Cranberry Citrus Muffins

Prep TIme: 8 Min
Cook Time: 16 - 18 Min

 
  1. Preheat oven to 400 F
 
  1. In a large mixing bowl, combine all dry ingredients and whisk together. Stir in the whole cranberries as well as the orange / lime zest.  Make a pool in the center for the liquids.
 
  1. Using a measuring cup, measure out the 2/3 C milk. Add the egg and vanilla straight to the milk and whisk together.
 
  1. Pour the liquid mixture into the dry mixture as well as the lime juice and work together until mixture is thoroughly combined and a batter like dough is formed.
 
  1. Spray a muffin tin with baking spray before scooping the mixture into the tin using an ice cream scoop. Sprinkle each muffin with a little sugar and place in oven to bake 16 – 18 Min.
 
  1. Transfer muffins to a wire rack and serve while hot.


Muffins are great because you can feature all sorts of ingredients in them. I used Cranberries, Orange, and Lime but there are so many choices when it comes to muffins. Strawberry, Mixed Berry, Blueberry and Lemon, Lime and Coconut, or even a tasty Apple Crumble?


                    Grocery List
  • 2 C AP Flour
  • 2/3 C Sugar
  • 2 Tsp. Baking Powder
  • ¼ Tsp. ground Sea Salt
  • 1 C fresh Cranberries
  • Zest of 1 large Orange
  • Zest of 1 Lime
  • 2/3 C 2% Milk
  • ¼ C Unsalted Butter, melted
  • ½ Tsp. Vanilla Extract
  • 1 Egg
  • Juice of ½ Lime
Picture
0 Comments

Cheddar & Jalapeno Buttermilk Biscuits

11/9/2015

0 Comments

 
jalapenochedbiscuits.docx
File Size: 120 kb
File Type: docx
Download File

Picture
Cheddar & Jalapeno Buttermilk Biscuits


Prep Time: 10 Min
Cook Time: 12 – 15 Min
10 – 12 Biscuits

 
  1. Preheat oven to 450 F.
 
  1. Combine all dry ingredients in a large mixing bowl. Shred the cold butter into the dry mix and gently cut it into the flour using a pastry cutter. (A fork will do as well!)
 
  1. Add in the shredded cheddar and diced jalapenos. Stir gently to combine. Pour in the buttermilk and use a wooden spoon to slowly work the flour into the buttermilk. The dough should be fairly sticky (add buttermilk if needed), once combined transfer the dough to a floured surface and gently pat it out. Fold the dough over itself a few times and gently pat out once again.
 
  1. Use a biscuit cutter (A glass works great too!) to cut the biscuits. Once cut, transfer the biscuits to a baking sheet that has been lightly sprayed with olive oil spray. Place the biscuits on the tray evenly apart and spray them with the oil spray.
 
  1. Bake for 12 – 15 Minutes.
 
  1. Transfer to a wire rack to cool and serve.


                            Grocery List

  • 2 C AP Flour
  • 1 Tbsp. Baking Powder
  • 1 Tsp. Sea Salt
  • ¼ Tsp. Baking Soda
  • 1/8 Tsp. Sugar
  • 6 Tbsp. Unsalted Butter, cold & shredded
  • 1 C Old Cheddar Cheese, shredded
  • 1 Jalapeno, seeded and diced
  • 1 1/3 C Buttermilk
 

Picture
0 Comments

Southwestern Beans continued. . . 

11/8/2015

0 Comments

 
southwesternbeans_quick_.docx
File Size: 167 kb
File Type: docx
Download File

Picture
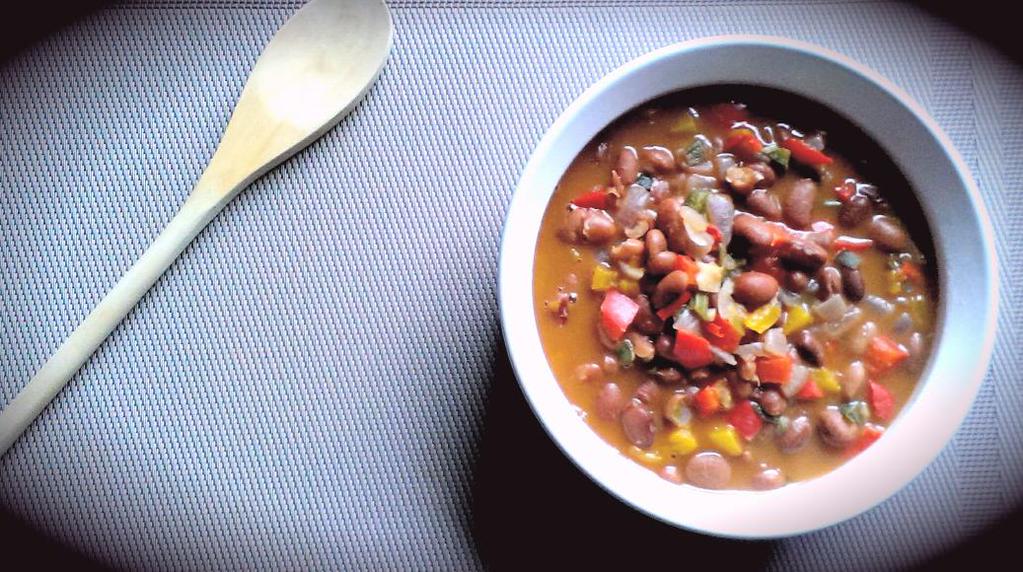
ORIGINAL RECIPE ABOVE

Remember when I said these beans were the beginnings of a few great recipe ideas? Well, I came up with a few delicious reasons you should be making a double batch of these beans right away.

1. Pureed / Refried: After the beans and all vegetables have fully cooked through, you can prepare them one of two different ways from here.
  • Grab the food processor and puree the beans until they are the consistency you desire. Super rich and creamy or perhaps a bit chunky? Return to the saucepan on medium with a Tbsp. of unsalted butter and bring to a boil. Reduce heat until service.** (If the beans are too thick, cover them while simmering. If the beans appear too thin, leave them simmering uncovered)
  • Grab your hand blender and give them a good puree right in the pan! I used this method and they turned out wonderfully. You still get some whole beans and the flecks of colour from the veg are gorgeous!
Picture
You could eat them from there as a tasty side dish or from this point. . . .
2. Bean "Dip" these beans! Melt some of your favourite cheese on top and get the tortilla chips out. The consistency of the refried / pureed beans is perfect for dipping! Monterey Jack, Cheddar, Tex Mex, any of these will do!

3. Use them in your favourite Mexican dishes. Tacos, Burritos, Tostadas, all of these classic dishes pair well with these Southwestern flavoured beans!

0 Comments
<<Previous

    Archives

    September 2023
    August 2023
    July 2023
    June 2023
    May 2023
    April 2023
    March 2023
    February 2023
    January 2023
    December 2022
    November 2022
    October 2022
    September 2022
    August 2022
    July 2022
    June 2022
    May 2022
    April 2022
    March 2022
    February 2022
    January 2022
    December 2021
    November 2021
    October 2021
    September 2021
    August 2021
    July 2021
    June 2021
    May 2021
    April 2021
    March 2021
    February 2021
    January 2021
    December 2020
    November 2020
    October 2020
    September 2020
    August 2020
    July 2020
    June 2020
    May 2020
    April 2020
    March 2020
    February 2020
    January 2020
    December 2019
    November 2019
    October 2019
    November 2018
    October 2018
    September 2018
    August 2018
    July 2018
    June 2018
    May 2018
    April 2018
    March 2018
    February 2018
    January 2018
    December 2017
    November 2017
    October 2017
    September 2017
    August 2017
    July 2017
    June 2017
    May 2017
    April 2017
    March 2017
    February 2017
    January 2017
    December 2016
    November 2016
    October 2016
    September 2016
    August 2016
    July 2016
    June 2016
    May 2016
    April 2016
    March 2016
    February 2016
    January 2016
    December 2015
    November 2015
    October 2015
    September 2015
    August 2015
    July 2015
    June 2015
    May 2015
    April 2015
    March 2015
    February 2015
    January 2015
    December 2014
    November 2014

    Jonathan - Happy Veg

    Recipes that everyone in the house will love, guaranteed.

    Categories

    All

Proudly powered by Weebly
Photos used under Creative Commons from Marcus Bichel Lindegaard, JeepersMedia, regan76, Kjokkenutstyr.net, Muffet, wuestenigel
  • The Happy Veggie
  • Recipes
  • Animal News
  • Bypass or Buy?
  • My Personal Blog
  • Kitchen, Veggies, and Health
  • Archives
  • VIDEOS